There’s nothing quite like a fire pit to bring people together it’s the one backyard addition that instantly makes every evening feel like an occasion. These 23 backyard fire pit ideas cover everything from sunken stone circles to sleek modern designs giving you the perfect setup for cozy nights, s’mores, and unforgettable gatherings. Let’s explore these backyard fire pit ideas for warm and memorable gatherings!
If you’re planning the whole yard around this feature, there are other cozy backyard layouts to explore too.
Sunken Stone Conversation Pit
A sunken stone conversation pit creates a cozy and intimate outdoor gathering space. The lowered seating area adds depth and architectural interest, while the natural stone materials bring warmth and timeless appeal. This design encourages relaxation and conversation, making it a perfect feature for entertaining guests or enjoying quiet evenings outdoors.
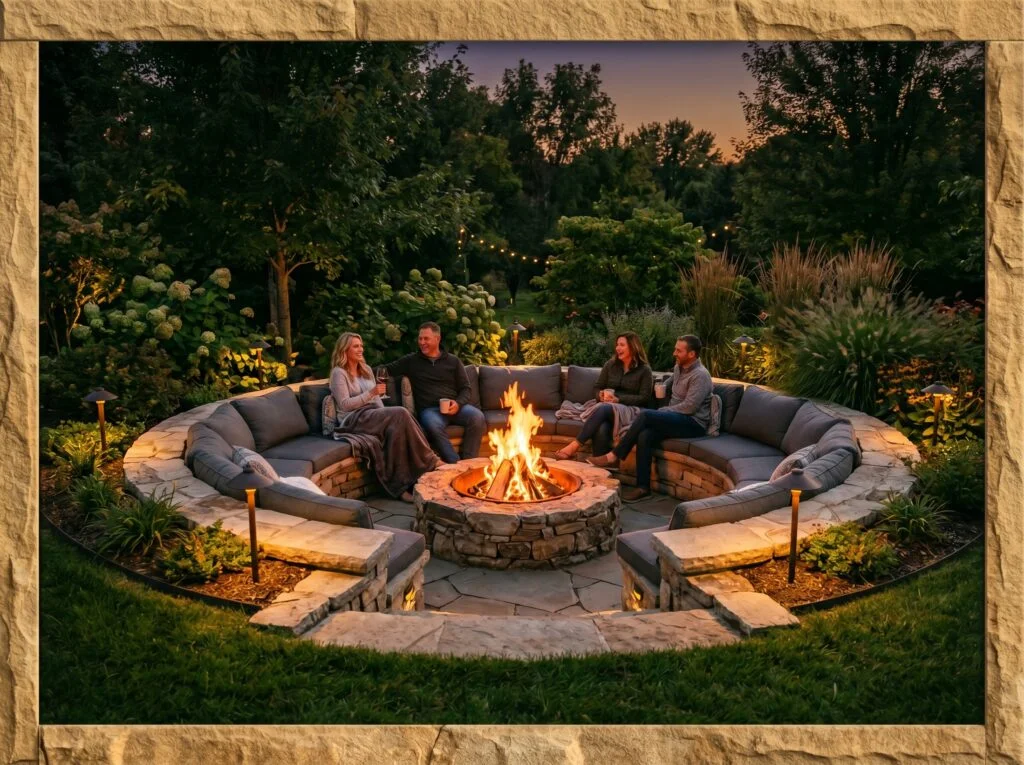
A sunken conversation pit is the most dramatic and architecturally impressive backyard fire pit design available and it solves several practical problems simultaneously. Lowering the seating area 18 to 24 inches below grade creates a natural windbreak that keeps the fire burning more consistently and keeps the warmth concentrated at body level rather than dispersing upward. The excavated walls also create a sense of enclosure and privacy that an above-grade patio never achieves sitting in a sunken pit feels genuinely intimate and separate from the rest of the yard.
The construction involves excavating the seating area, pouring a concrete base, building up the retaining walls in stone or poured concrete, and installing the central fire bowl or built-in fire pit. This is a project that typically requires professional excavation and masonry work budget $3,000 to $10,000 depending on size and material quality. The investment pays off in home value: a well-built sunken conversation pit is one of the outdoor features that genuinely shows up as a selling advantage in real estate listings. Use matching stone for both the retaining walls and the fire pit surround for the most cohesive, built-for-this-space appearance.
Beyond the structure itself, landscaping that frames the flames can make the whole sunken area feel finished.
Classic Round DIY Stone Ring
A classic round DIY stone ring is a timeless fire pit design that blends beautifully with almost any outdoor setting. The circular shape encourages conversation and creates a cozy gathering spot, while the natural stone finish adds rustic charm and durability. This simple design is also easy to build and customize to match different landscape styles.
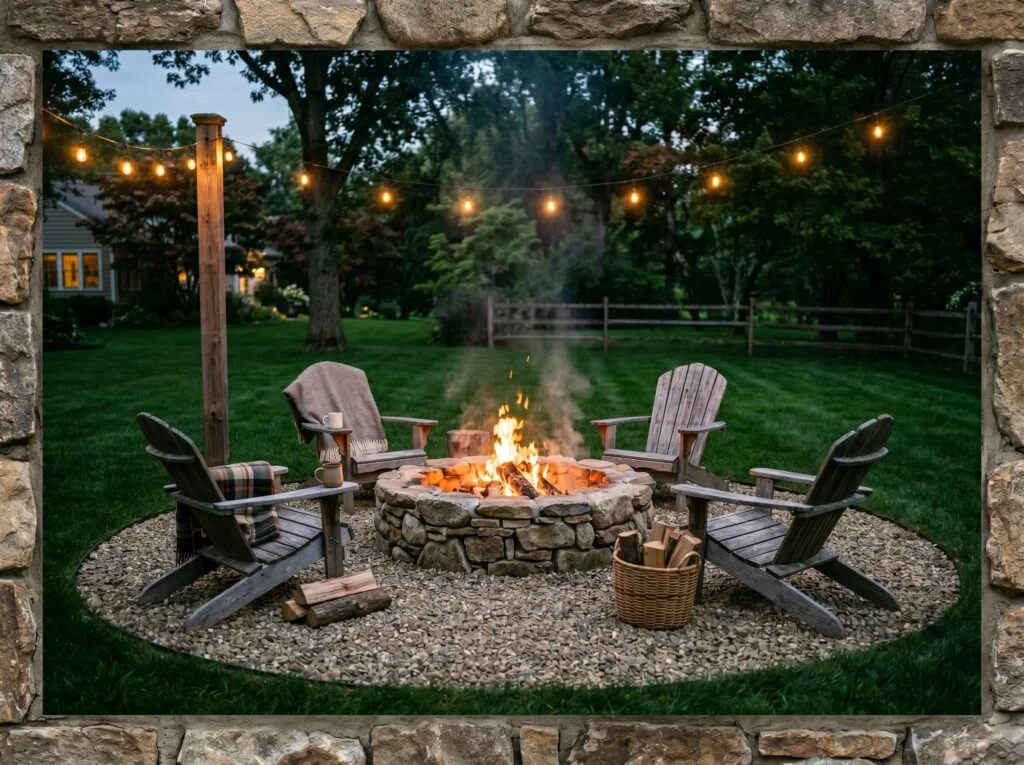
A simple DIY stone ring fire pit is the most accessible backyard fire pit project available it costs between $50 and $200 in materials and can be built in a single afternoon with zero masonry experience. Choose a flat, level area at least 10 feet from any structure, mark a circle about 4 feet in diameter, and stack two to three courses of fire-rated retaining wall blocks or natural fieldstone around the perimeter. The result is a permanent, functional, and genuinely attractive fire pit that fits naturally into almost any backyard landscaping style.
Use fire-rated blocks or natural stone never standard concrete blocks, river rocks, or any porous stone that may contain trapped moisture. When heated repeatedly, moisture inside porous rocks converts to steam, builds pressure, and can cause the rock to crack or even explode dangerously. Retaining wall blocks rated for fire pit use are available at any home improvement store for $2 to $4 per block. Gravel ground cover inside the ring and extending several feet around the base is the safest and most attractive base material it provides drainage, prevents grass from catching stray embers, and gives the fire pit area a defined, purposeful appearance.
Propane Gas Fire Table for Modern Patios
A propane gas fire table adds warmth and modern elegance to patios and outdoor living spaces. Its clean design creates a stylish focal point while providing instant flames without the smoke or cleanup of a traditional fire pit. This convenient option is perfect for entertaining guests and enjoying comfortable outdoor gatherings year-round.
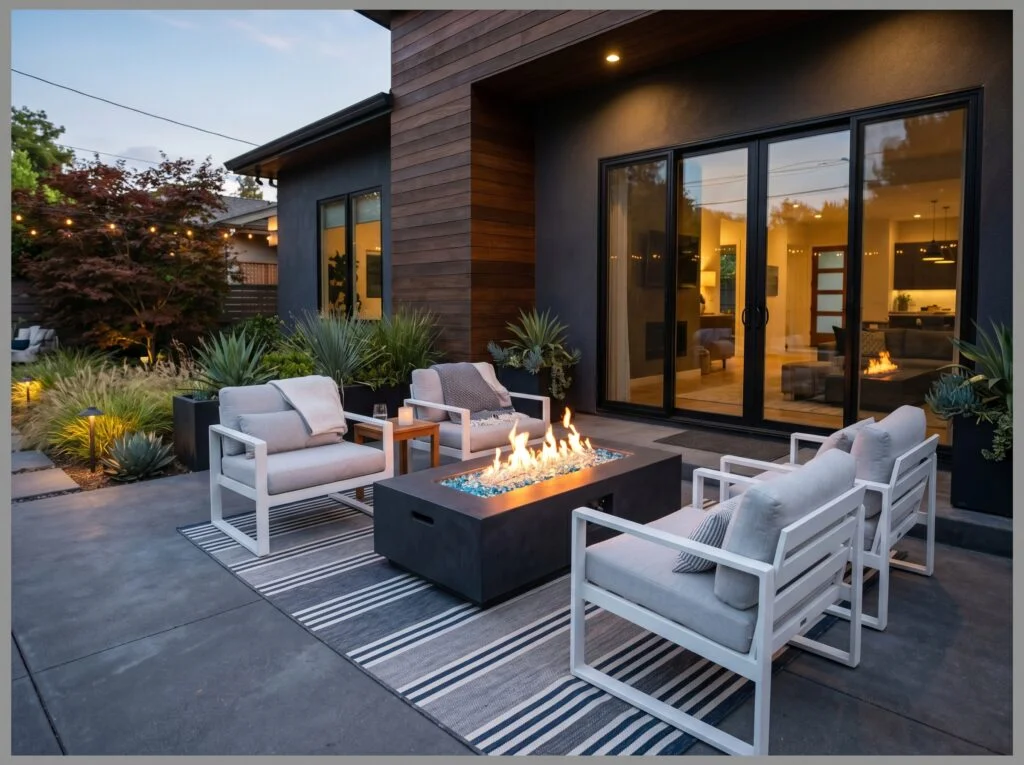
A gas fire table is the best choice for homeowners who want fire pit ambiance without the wood-burning maintenance routine. There’s no ash to clean, no wood to stack and store, no smoke following guests around the seating area, and no waiting for the fire to die down before going inside. Turn it on with a knob or a remote, adjust the flame height, and turn it off completely when the evening is over. For patios that connect directly to the house especially those with an outdoor kitchen or bar setup a gas fire table integrates into the entertainment flow seamlessly.
Most gas fire tables run on a 20-pound propane tank stored inside the table base completely hidden, with a capacity of roughly 4 to 8 hours of use per tank at medium flame height. For a permanent installation, connecting to a natural gas line eliminates the tank refilling requirement entirely you’ll need a licensed plumber to run the gas line and connect the table. Natural gas connection costs $200 to $500 typically and pays for itself in propane savings within a season of regular use. Choose glass fire media (the colored glass pieces surrounding the burner) in blue, clear, copper, or black to match your outdoor furniture color palette.
Built-In Square Brick Fire Pit
A built-in square brick fire pit brings a classic and structured look to outdoor living areas. The durable brick construction adds warmth and timeless appeal, while the square shape creates a defined gathering space for seating and conversation. This design blends beautifully with traditional, rustic, and modern landscape styles.
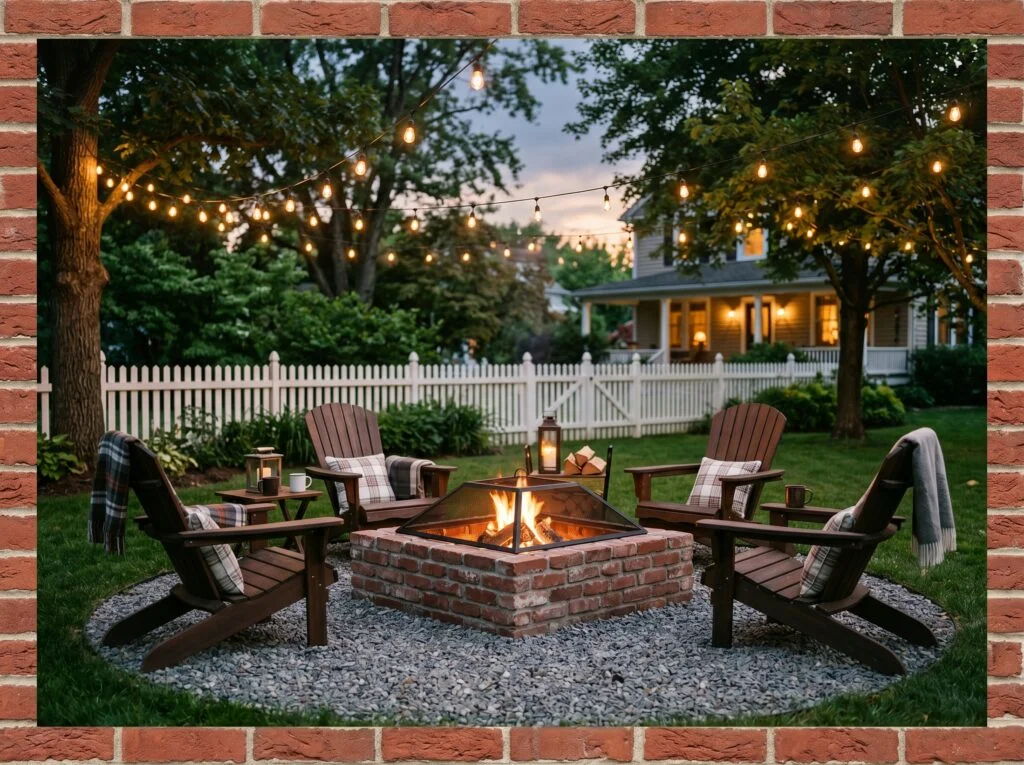
A square brick fire pit has a clean, structured geometry that a round stone ring lacks it fits particularly well in a formal garden layout, beside a rectangular patio, or against the backdrop of a traditionally styled home. Red clay brick is the classic material because it’s genuinely fire-rated, widely available, affordable, and produces a warm, rich tone that ages beautifully. A square fire pit at 36×36 inches is a manageable size that holds a significant fire without requiring an outsized seating area to accommodate it comfortably.
Building a square brick fire pit requires basic masonry skills and fire-rated mortar (standard mortar cracks under the repeated high-heat cycles a fire pit generates). Use firebrick for the interior lining the layer of brick directly exposed to the fire and standard red brick for the exterior courses. Firebrick is denser and specifically engineered to withstand prolonged high-temperature exposure without cracking or spalling. Line the bottom of the pit with a two-inch gravel or sand base to promote drainage and prevent moisture buildup in the base. Total material cost for a well-built 36-inch square brick fire pit runs $150 to $400 depending on brick type and size.
Smokeless Fire Pit for Suburban Yards
A smokeless fire pit is an excellent choice for suburban yards, offering warmth and ambiance with significantly less smoke. Its efficient design improves airflow and reduces lingering odors, making outdoor gatherings more comfortable for family and neighbors. This modern option also provides a clean, stylish look that fits well in a variety of backyard settings.
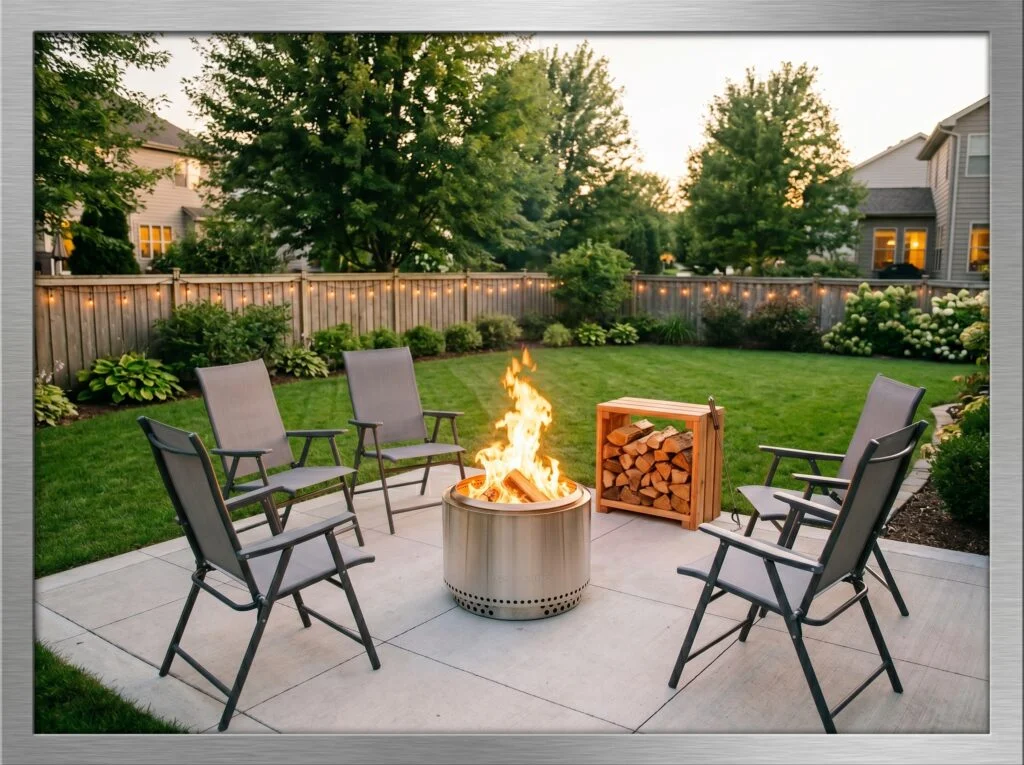
Smokeless fire pits are one of the most significant innovations in backyard fire pit design they use a secondary combustion system that re-burns the smoke particles before they exit the top of the pit, dramatically reducing the smoke output of a wood fire. For suburban yards where smoke can drift toward neighbor fences and windows, this technology makes a wood-burning fire pit genuinely practical in situations where a traditional open wood fire might generate complaints. The fire itself looks and sounds completely authentic real wood, real crackle, real flame with a fraction of the smoke.
Brands like Solo Stove, BioLite, and Breeo pioneered this technology, and all three produce excellent products at different price points. The double-wall stainless steel construction allows air to heat in the gap between the walls and re-enter the fire chamber through a ring of holes at the top, creating the secondary burn that eliminates most smoke. A 19 to 27-inch diameter smokeless pit works well for most backyard settings. These pits also burn wood very efficiently you use less wood per evening than a traditional open ring fire pit because the airflow dynamics of the double-wall design create a hotter, cleaner burn. The main drawbacks are the price premium ($200 to $500 versus $50 to $150 for a basic stone ring) and the inability to use a spark screen since the design requires unrestricted top airflow.
Paver Stone Fire Pit with Curved Bench Seating
A paver stone fire pit with curved bench seating creates a cozy and inviting gathering area in the backyard. The curved layout encourages conversation and comfortably accommodates more guests, while the durable paver stones add texture and timeless appeal. This design combines functionality and style, making it perfect for entertaining and relaxing outdoors.

A paver stone fire pit paired with a matching curved retaining wall bench creates the most complete and cohesive backyard fire pit composition available at a DIY-accessible price point. The curved bench walls typically built from the same retaining wall block as the fire pit itself eliminate the need for separate outdoor furniture around the fire. The seating is permanent, defined, and designed specifically for this space. It creates a clear outdoor room around the fire pit that reads as intentionally designed rather than assembled from separate purchases.
Build the bench walls at standard seat height of 17 to 18 inches and at least 14 inches wide for comfortable sitting. The flat top of the retaining wall bench can be finished with natural stone caps bluestone, travertine, or natural granite for a more refined appearance and a smoother sitting surface. Use three-inch thick outdoor cushions in a weatherproof fabric (Sunbrella is the industry standard for outdoor cushion durability) for comfort and style. Adding a gravel or decomposed granite base material inside the seating area rather than extending the patio pavers gives the fire pit zone a distinct identity and provides excellent drainage. Total project cost for a medium-sized paver fire pit with bench seating: $800 to $2,500 depending on materials.
For more ways to furnish the space, seating designed for gathering around a flame is worth browsing.
Concrete Block Modern Fire Pit
A concrete block modern fire pit offers a sleek and contemporary look with clean lines and durable construction. The minimalist design blends well with modern landscapes, while the sturdy materials provide long-lasting performance. This stylish fire pit creates a warm focal point and adds a sophisticated touch to outdoor living spaces.
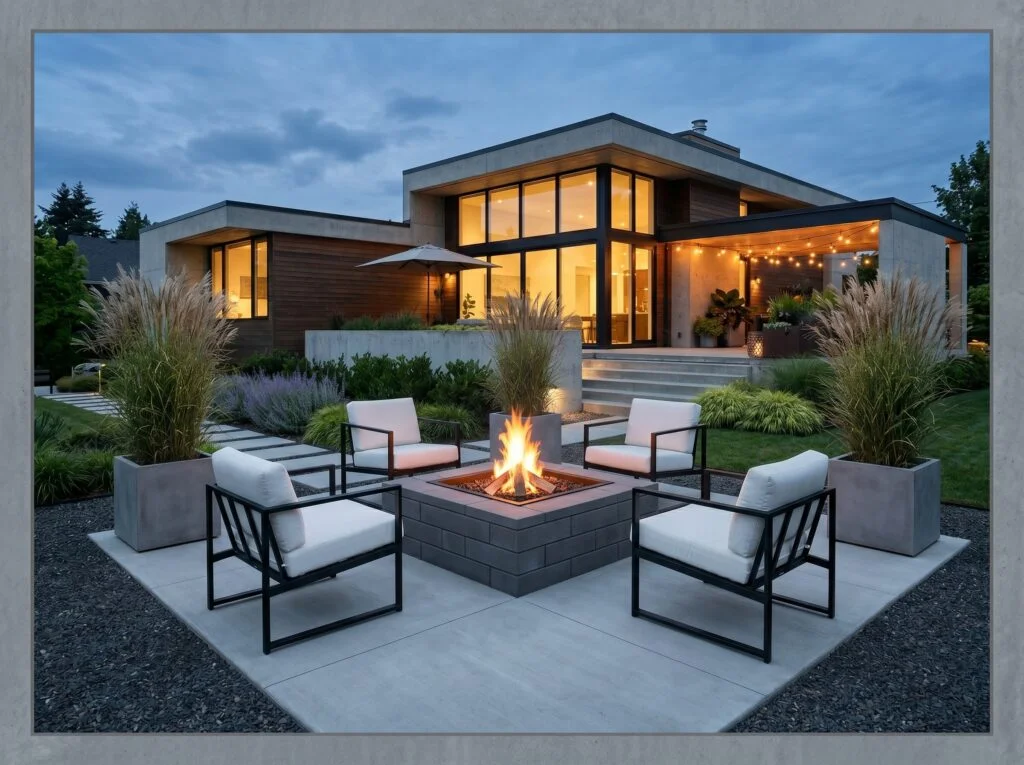
Smooth concrete block fire pits are the modern minimalist alternative to traditional brick and stone designs. The clean, flat faces and precise right angles of smooth concrete blocks create a geometric, architectural fire pit that complements contemporary and modern home styles far better than rustic stacked stone or traditional red brick. Concrete masonry units (CMUs) are inexpensive, widely available, genuinely fire-resistant, and simple to stack into a clean rectangular or square form without the mortar-and-trowel skills that traditional masonry requires. The gray tones coordinate naturally with most modern patio materials concrete pavers, porcelain tile, polished aggregate.
Line the interior of a concrete block fire pit with firebrick or a pre-formed fire pit insert the hollow cores of standard CMUs don’t provide the solid, dense fire resistance of firebrick, and lining the interior protects the concrete blocks from the most intense heat exposure. A steel fire grate set inside raises the wood off the base and improves airflow beneath the fuel for a cleaner, hotter burn. Cap the top course of blocks with smooth concrete or bluestone caps for a finished edge that’s comfortable to lean against and looks polished from every angle. Paint the exterior of the concrete blocks with a masonry-rated heat-resistant paint if you want a specific color other than the natural gray.
Fireplace-Style Outdoor Fire Feature
A fireplace-style outdoor fire feature brings the comfort and elegance of an indoor fireplace to your backyard. Its vertical design creates a stunning focal point while providing warmth and a cozy atmosphere for outdoor gatherings. This feature also adds architectural interest and enhances the overall appeal of patios and outdoor living areas.
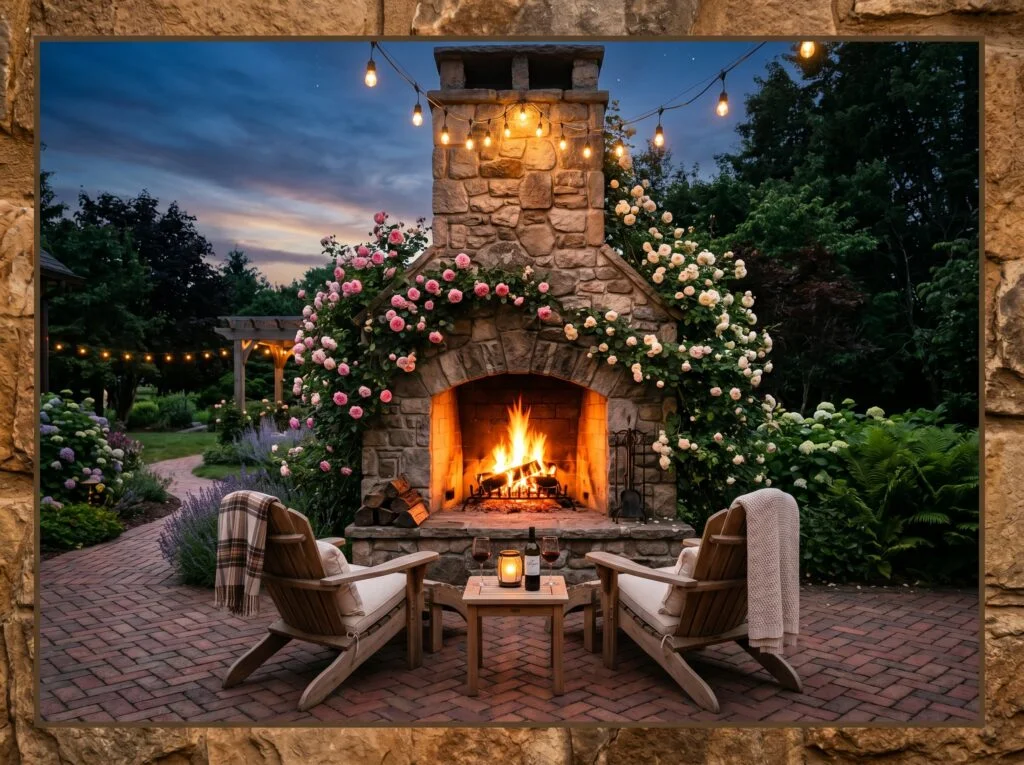
A freestanding outdoor fireplace takes the backyard fire feature to its most dramatic and architecturally impressive form. Unlike a fire pit where everyone sits around the flame, an outdoor fireplace creates a directional focal point guests sit facing it, creating a more intimate, theater-like gathering dynamic. The chimney draws smoke upward and away from the seating area effectively, making outdoor fireplace smoke management significantly better than an open pit fire in many conditions. The structure itself also provides a sense of enclosure and definition that transforms a flat patio into a genuine outdoor room.
Full masonry outdoor fireplaces require professional design and construction a proper foundation, a correctly proportioned firebox, a functioning smoke chamber and throat, and a chimney that draws properly are all engineering considerations that impact both safety and performance. Budget $3,000 to $8,000 for a well-built masonry outdoor fireplace. Prefabricated outdoor fireplace units made from refractory concrete are a more accessible option at $800 to $2,500 they can be installed by a competent DIYer in a weekend and then veneered in stone, brick, or stucco for a custom appearance. Both options add genuine home value and create a backyard focal point that photographs beautifully in every season.
Fire Pit on a Gravel Patio
A fire pit on a gravel patio creates a relaxed and low-maintenance outdoor gathering space. The gravel surface provides excellent drainage and adds a natural, rustic texture that complements various landscape styles. This simple setup is both budget-friendly and visually appealing, making it perfect for cozy evenings and casual entertaining.
A gravel patio is the safest and most practical base surface for a fire pit in a residential backyard and it’s dramatically easier and less expensive to install than poured concrete, brick, or pavers. Decomposed granite, pea gravel, or crushed stone provide a non-combustible surface that completely eliminates the risk of stray embers igniting the ground material. They also provide excellent drainage so rainwater doesn’t pool around the fire pit base or in the seating area after rain. A 12 to 15-foot diameter gravel circle creates a generous fire pit seating area that accommodates six to eight chairs comfortably.
Define the edge of the gravel area with low cedar edging boards, steel landscape edging, or a simple low stone border the defined edge prevents gravel from migrating into the lawn and gives the fire pit area a clean, purposeful appearance from every angle. A depth of 3 to 4 inches of gravel provides adequate ground cover without being so deep that chairs sink and become unstable. Landscape fabric beneath the gravel prevents weed growth without impeding drainage. The entire gravel patio fire pit area can be installed for $200 to $800 in materials one of the most cost-effective ways to create a completely safe, functional, and attractive fire pit setting.
Once the base is down, chairs built for lounging by the fire complete the setup nicely.
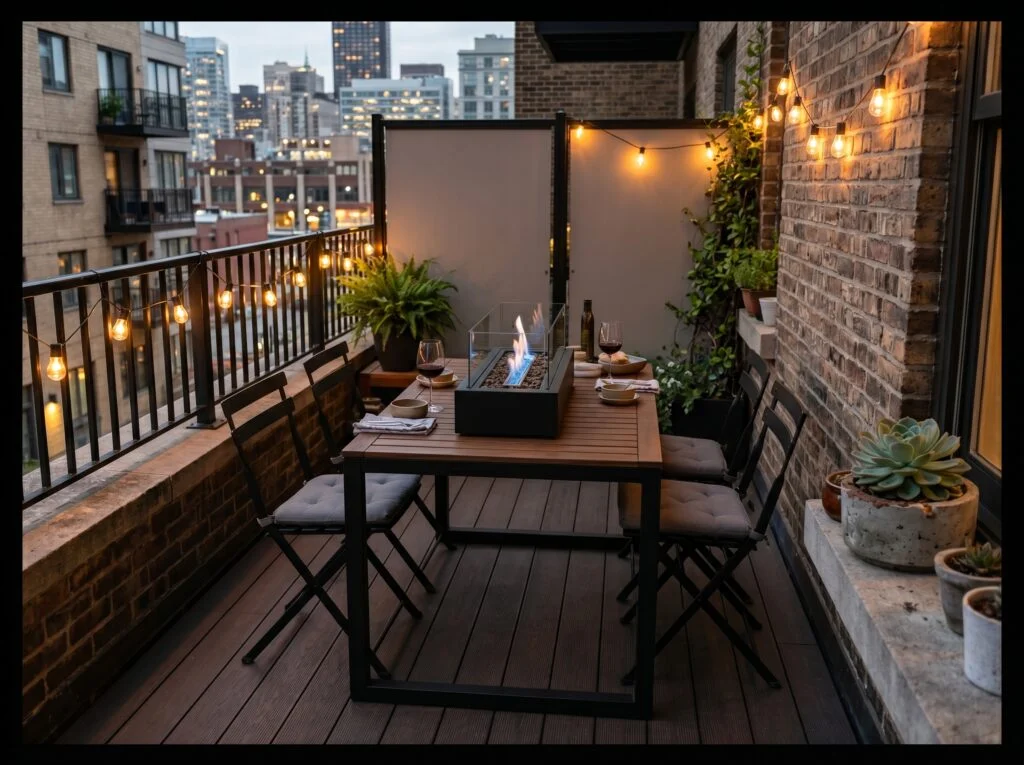
Tabletop Bioethanol Fire Pit for Small Patios
A tabletop bioethanol fire pit is a stylish and space-saving option for small patios and balconies. Its compact design provides warmth and ambiance without requiring a large setup, making it ideal for limited outdoor spaces. The clean-burning fuel also produces minimal smoke, creating a cozy and modern atmosphere for relaxing evenings.

Bioethanol fire pits are the right solution for balconies, small patios, rooftop terraces, and any outdoor space where a wood-burning or gas fire pit is prohibited or impractical. Bioethanol (a plant-derived alcohol fuel) burns completely cleanly no ash, no smoke, no particulates, and no requirement for a gas line or chimney. The flame is real genuine orange and blue fire and produces a modest amount of heat appropriate for intimate seating at a table or around a small patio arrangement. For urban environments, rental properties, and homeowners’ association (HOA)-governed communities, bioethanol is often the only fire option that complies with fire regulations.
Bioethanol burners come in tabletop versions that sit directly on an outdoor dining table as a centerpiece, floor-standing versions at fire pit height, and wall-mounted versions for a patio fireplace effect. The fuel costs roughly $2 to $4 per hour of operation at full flame, which makes it more expensive per hour than propane or wood but more convenient than either for small-scale use. Use only bioethanol fuel formulated for indoor/outdoor fire features never substitute any other alcohol fuel, which can produce dangerous combustion behavior. Keep a fire extinguisher nearby and never refill the burner while the fire is lit or while the burner is still warm from recent use.
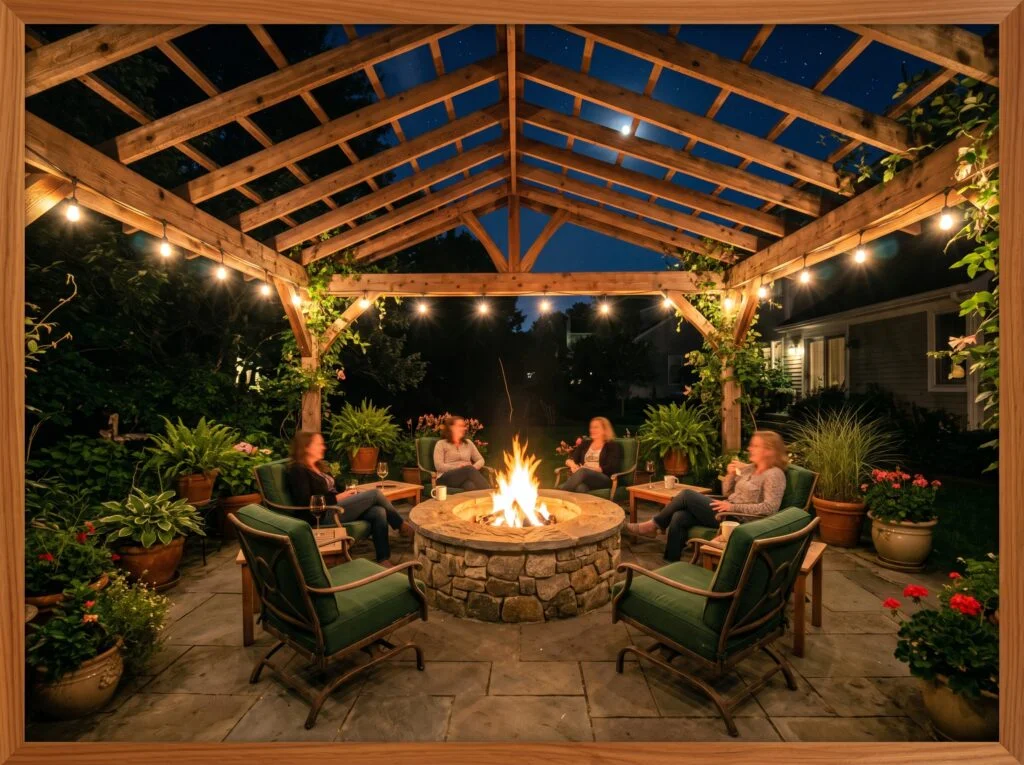
Fire Pit Under a Pergola
A fire pit under a pergola creates a cozy and inviting outdoor retreat with added architectural charm. The pergola helps define the seating area and provides a stylish framework for lighting, curtains, or climbing plants. This combination transforms the backyard into a comfortable space for relaxing and entertaining throughout the year.
A fire pit under a pergola is one of the most popular and most misunderstood backyard configurations beautiful when done correctly, genuinely dangerous when done incorrectly. The key distinction: an open-roof pergola (slatted rafters with significant sky visible between them) is safer for a gas fire table or bioethanol fire feature but requires caution with wood burning, which produces airborne embers. A fully covered pergola, gazebo, or any enclosed overhead structure is not appropriate for any open wood-burning fire pit embers, smoke, and carbon monoxide build-up create serious fire and health hazards.
For a pergola fire pit that’s both safe and stunning, use a gas fire table or bioethanol burner rather than a wood-burning pit. The absence of embers and smoke removes the primary hazards of combining overhead structure with open flame. If you want a wood fire under a pergola, ensure the structure is genuinely open-slatted with at least 40 to 50 percent open sky above the pit, position the fire pit directly centered under the peak of the structure for maximum vertical clearance, and use a quality spark screen to contain embers. Never build an overhead pergola structure from combustible materials if you plan to use it over a wood-burning fire the 10-foot horizontal clearance rule applies to overhead structures just as much as to adjacent walls.
Fire Pit with Surrounding Raised Garden Beds
A fire pit surrounded by raised garden beds creates a beautiful blend of warmth and natural greenery. The elevated planters add color, texture, and seasonal interest while helping define the gathering area. This thoughtful design makes the outdoor space feel more inviting, cozy, and connected to the surrounding landscape.
Integrating a fire pit into an existing garden by surrounding it with raised planting beds creates one of the most beautiful and cohesive backyard fire pit settings possible. The raised beds serve as living walls that define the fire pit zone, provide natural privacy screening, absorb the fire’s ambient light to create a glowing green backdrop, and fill the air around the seating area with the fragrance of herbs and flowers. Lavender, rosemary, ornamental grasses, and flowering perennials all thrive in the sunny, open conditions of a fire pit clearing while contributing fragrance and visual beauty to the evening atmosphere.
Maintain a minimum of 5 to 6 feet between the outer edge of the fire pit and the nearest planted bed for safety combustible plant material, even when green and healthy, should stay well clear of the fire. Use cedar or composite lumber for raised bed construction adjacent to a fire pit area both materials handle the heat differential and humidity fluctuations of proximity to a fire without warping or deteriorating quickly. The combination of stone fire pit, gravel ground cover, and surrounding raised beds creates a completely self-contained outdoor room that requires no additional furniture, landscaping, or decoration to look like a professionally designed backyard feature.
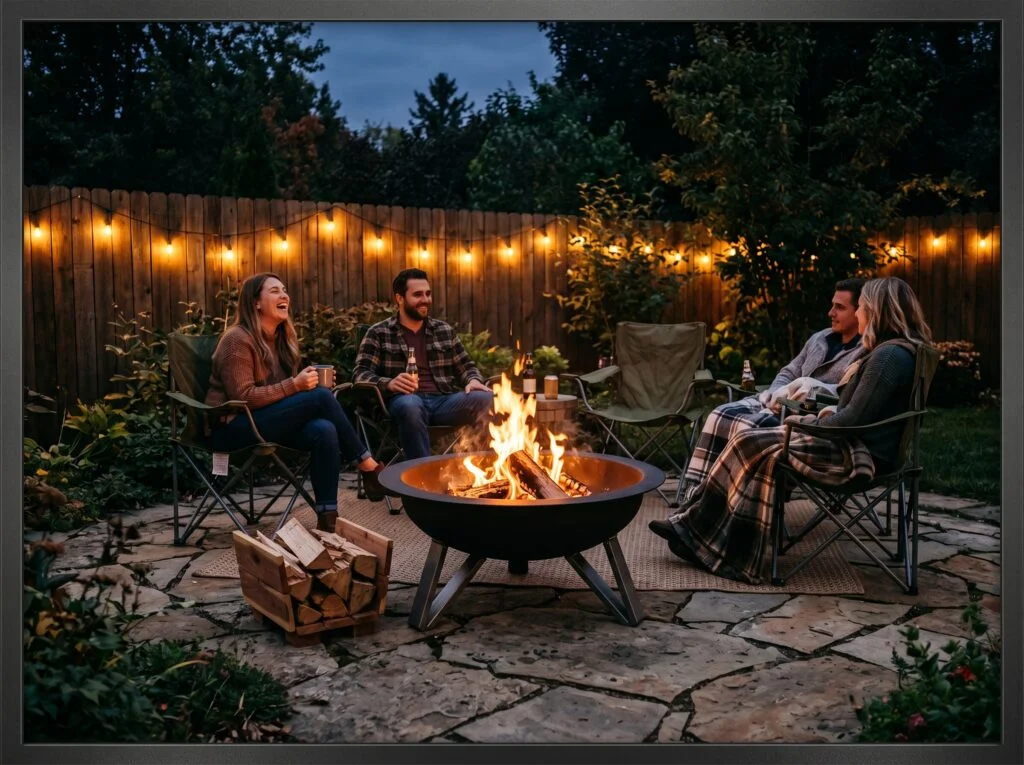
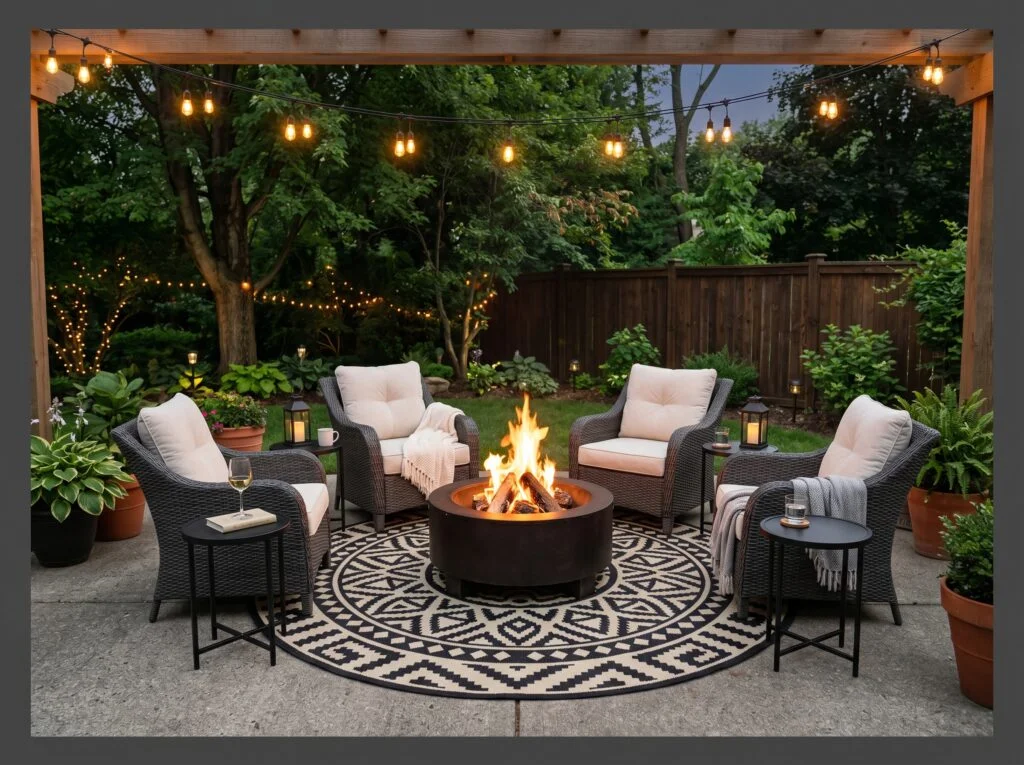
Fire Pit with String Light Canopy
A fire pit with a string light canopy creates a warm and magical outdoor atmosphere perfect for evening gatherings. The soft lighting adds charm and enhances the cozy ambiance, while also providing gentle illumination around the seating area. This combination makes the backyard feel inviting, stylish, and ideal for entertaining guests.
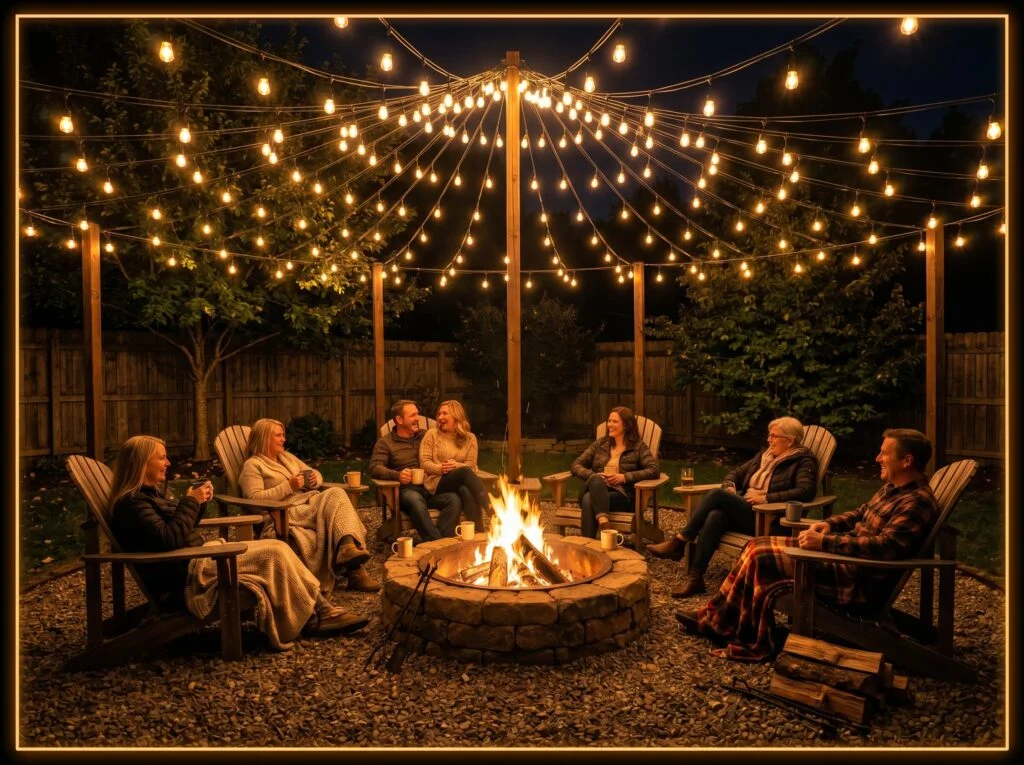
A string light canopy hung from a central point above the fire pit outward to surrounding fence posts or installed poles is the single decorating addition that most dramatically elevates a basic fire pit area into something genuinely magical. The combination of firelight from below and warm string light glow from above creates a perfectly layered ambient lighting composition that’s extremely difficult to achieve with any other lighting approach. Every gathering feels like a special occasion because the lighting itself communicates that this outdoor space was prepared with care and intention.
The most common method is a single anchor point a tall wooden post set in a concrete footing at the center of the seating area, or an existing tall tree from which the string lights radiate outward like an umbrella to surrounding attachment points at fence posts, house walls, or secondary poles. Use outdoor-rated string lights with heavy-gauge wire and Edison-style bulbs in a warm 2200K to 2700K color temperature. Space attachment points evenly at 8 to 10 feet apart around the perimeter. Stagger the light strings at different heights at the perimeter attachment for a more organic, layered look rather than a single flat plane of light. The investment runs $60 to $200 in lights and hardware and repays itself in ambiance on the very first evening.
For even more evening atmosphere, lighting that carries the glow further into the yard is worth considering.
Built-In Gas Fire Pit in a Raised Patio Wall
A built-in gas fire pit in a raised patio wall creates a sleek and sophisticated focal point for outdoor living spaces. The integrated design offers a clean, seamless appearance while providing instant warmth and convenience. This modern feature enhances both comfort and curb appeal, making patios feel more luxurious and inviting.
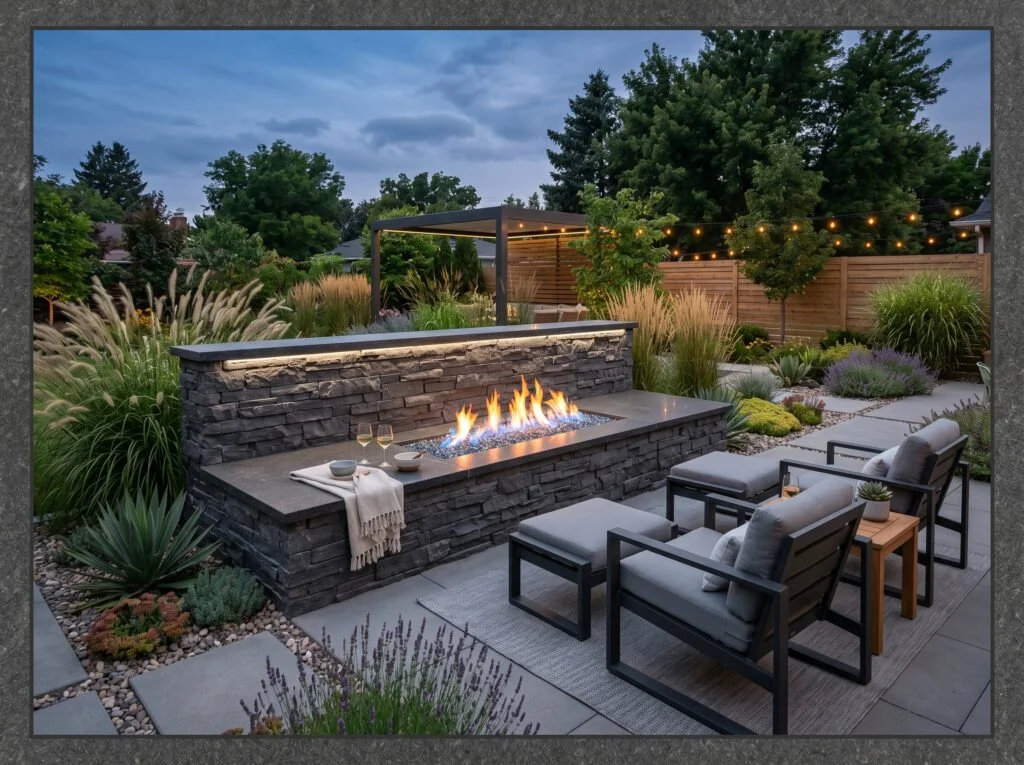
A built-in gas fire feature recessed into a raised retaining or seating wall is the most architecturally integrated fire pit option available it looks like the yard was designed around it rather than having a fire pit added to it. The fire element becomes part of the built structure, the wall serves dual purpose as both a seating surface and a fire feature housing, and the overall composition is clean and intentional in a way that freestanding fire pits can rarely achieve. This is the fire pit choice for a professionally landscaped backyard where every element is considered part of a unified design.
This type of installation requires planning from the landscape design phase the gas line needs to be run before the patio and wall are built, and the burner pan and valve housing need to be accommodated in the wall’s structural design. Use a licensed plumber for the gas line and a licensed contractor for the masonry structure. Choose a linear gas fire burner in a length proportional to the wall section 24 to 48 inches is typical for a residential application. Fire glass (crushed tempered glass in various colors), black lava rock, or natural river stone are all appropriate fire media for a built-in gas feature. The complete project cost ranges widely $2,500 to $8,000 but the result is a backyard that looks genuinely custom-designed and adds measurable home value.
Portable Steel Fire Bowl
A portable steel fire bowl offers flexibility and convenience for outdoor gatherings. Its lightweight design makes it easy to move around the patio or backyard, while the durable steel construction ensures long-lasting use. This versatile fire feature adds warmth and a cozy atmosphere, making it perfect for relaxing evenings and entertaining guests.
A portable steel fire bowl is the quickest path from fire pit idea to actual fire pit reality no construction, no excavation, no permit research, just buy and use. A quality steel fire bowl with a sturdy three or four-leg base costs $80 to $300, can be positioned anywhere in the yard at 10 feet from structures, and can be moved when your landscaping or outdoor living layout changes. For renters, for homeowners still deciding on their permanent outdoor living layout, or for anyone who wants a fire pit this weekend rather than after a three-month construction project, a portable fire bowl is the right answer.
Choose a steel bowl with a wall thickness of at least 1/8 inch thinner steel warps and burns through within a season of regular use. A diameter of 24 to 30 inches is the sweet spot for most backyard settings: large enough to hold a meaningful fire that provides real heat and visual impact, but not so large that it overwhelms a medium-sized patio. A mesh spark screen is an important safety accessory for any open steel fire bowl it reduces the risk of airborne embers from popping or crackling wood landing on nearby combustible surfaces. A grate insert inside the bowl elevates the wood above the base and dramatically improves airflow for a cleaner, more complete burn.
Natural Boulder Ring Fire Pit
A natural boulder ring fire pit brings a rustic and organic feel to outdoor spaces. The large stones create a timeless, nature-inspired look that blends beautifully with gardens and natural landscapes. This durable design also provides a cozy gathering spot, making it perfect for relaxing evenings and outdoor entertaining.
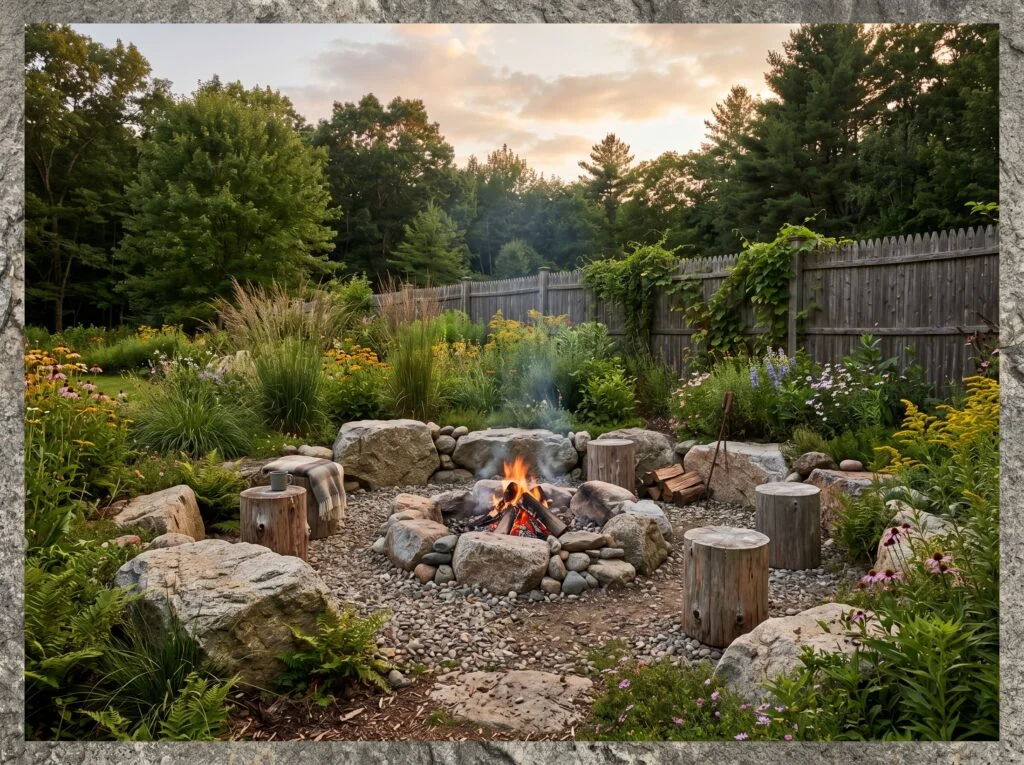
A natural boulder ring fire pit looks like it grew out of the ground rather than being built and that organic, unplanned quality is precisely what makes it beautiful in naturalistic garden settings. Large irregular boulders from a stone yard or quarry are set into the ground around the fire pit perimeter, creating a ring that looks like a natural rocky outcropping rather than a constructed fire feature. Each boulder is different in size, shape, and color, and the slight irregularity of the arrangement reinforces the natural, found quality of the design. In a yard with naturalistic plantings, prairie-style grasses, or a woodland edge, this fire pit looks completely at home.
Select boulders from a granite, basalt, or quartzite quarry or stone yard these are all dense, low-porosity stones that handle fire heat safely without absorbing enough moisture to cause cracking or explosive spalling. Avoid using standard river rocks or decorative landscape boulders from a typical garden center for the fire pit ring many of these are collected from riverbeds or other high-moisture environments and may contain dangerous levels of trapped moisture. Position boulders around a 4 to 5-foot diameter fire area with deliberate irregularity varying the boulder sizes, heights, and spacing. Use gravel or decomposed granite as the base material inside the boulder ring.
Corten Steel Fire Pit for Modern Landscape Design
A Corten steel fire pit adds a bold and contemporary touch to modern landscape designs. Its naturally weathered finish develops a rich rust-like patina over time, creating warmth and visual character. The durable material and sculptural appearance make it a striking focal point for stylish outdoor living spaces.
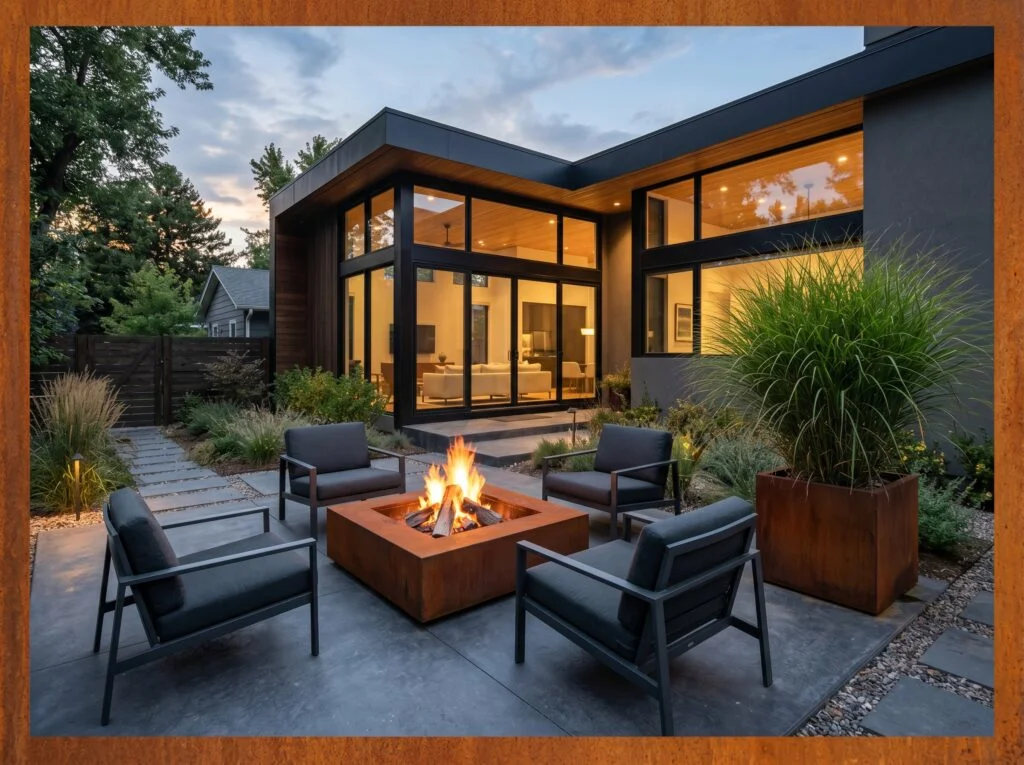
Corten steel also called weathering steel is the material that produces one of the most striking fire pit aesthetics available. It develops a rich, warm rust-orange patina as it weathers, which stabilizes into a protective layer that actually prevents further corrosion rather than progressing like standard rust. A Corten fire pit starts charcoal gray, develops patches of orange and brown within months, and eventually reaches a deep, rich red-brown patina that looks remarkable against green grass, concrete, or natural stone. In a modern or contemporary landscape, Corten steel fire features look genuinely architectural like a piece of outdoor sculpture that also produces warmth and light.
Corten steel requires a few care considerations that standard steel doesn’t. During the initial weathering period (typically the first six to twelve months), the runoff from the developing patina can stain light-colored concrete, stone, and patio surfaces a rust-orange color position a new Corten fire pit on gravel or darker stone surfaces during this phase, or accept and plan for temporary staining. The patina is stable once fully developed and produces very little additional runoff after that point. Corten fire pits are available in a range of sizes from 24 inches to 48 inches and in square, rectangular, and round profiles from several specialty outdoor metal fabricators. Budget $400 to $1,200 for a quality Corten fire pit.
Smores and Cooking Setup Fire Pit
A s’mores and cooking setup fire pit turns the backyard into a fun and interactive gathering space. The addition of grill grates or cooking accessories makes it perfect for roasting marshmallows, preparing simple meals, and enjoying outdoor entertaining. This versatile feature creates a warm, family-friendly atmosphere for memorable evenings.
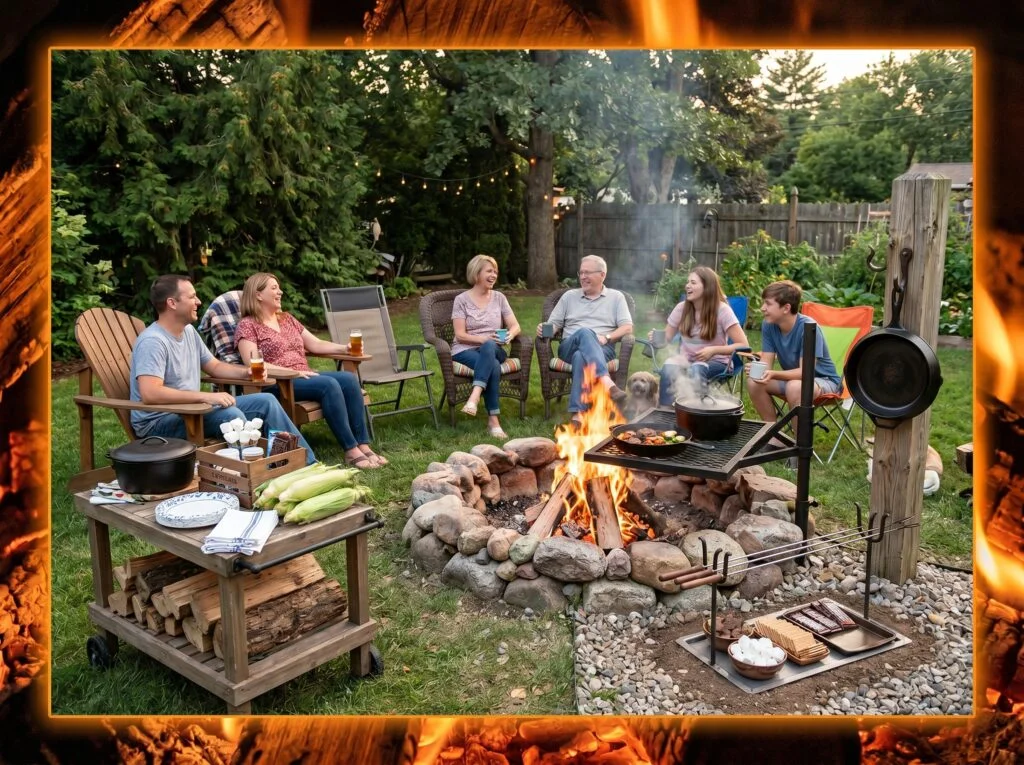
A fire pit optimized for cooking and s’mores is fundamentally different from a purely decorative or ambiance-focused fire feature and it’s the most family-friendly version you can build. A swing-arm cooking grate that hinges away from the fire when not in use and swings over the coals for grilling is the most versatile cooking addition. A set of metal roasting rod holders set into the ground beside the pit allows multiple people to roast marshmallows or hot dogs simultaneously without crowding around the fire awkwardly. A small cedar serving cart beside the fire pit holds cast iron cookware, roasting tools, and s’mores supplies in organized reach.
Wood selection matters significantly for a cooking fire pit. Hardwoods oak, hickory, apple, cherry, and maple burn hotter, longer, and cleaner than softwoods and produce coals rather than simply flames, which makes them far superior for cooking. Never burn treated lumber, painted wood, or wood from pallets with chemical stamps in any fire pit, and especially not in a cooking fire the combustion byproducts from treated or painted wood are toxic when inhaled and can contaminate food cooked over the smoke. Store firewood in a covered rack at least 20 feet from the fire pit to prevent pest infestation in the wood pile from migrating toward the house structure.
Fire Pit with Built-In Seating Wall and Lighting
A fire pit with a built-in seating wall and lighting creates a comfortable and well-designed outdoor gathering area. The permanent seating provides ample space for guests, while integrated lighting enhances safety and adds a warm ambiance after sunset. This combination makes the backyard feel more inviting, functional, and perfect for entertaining.
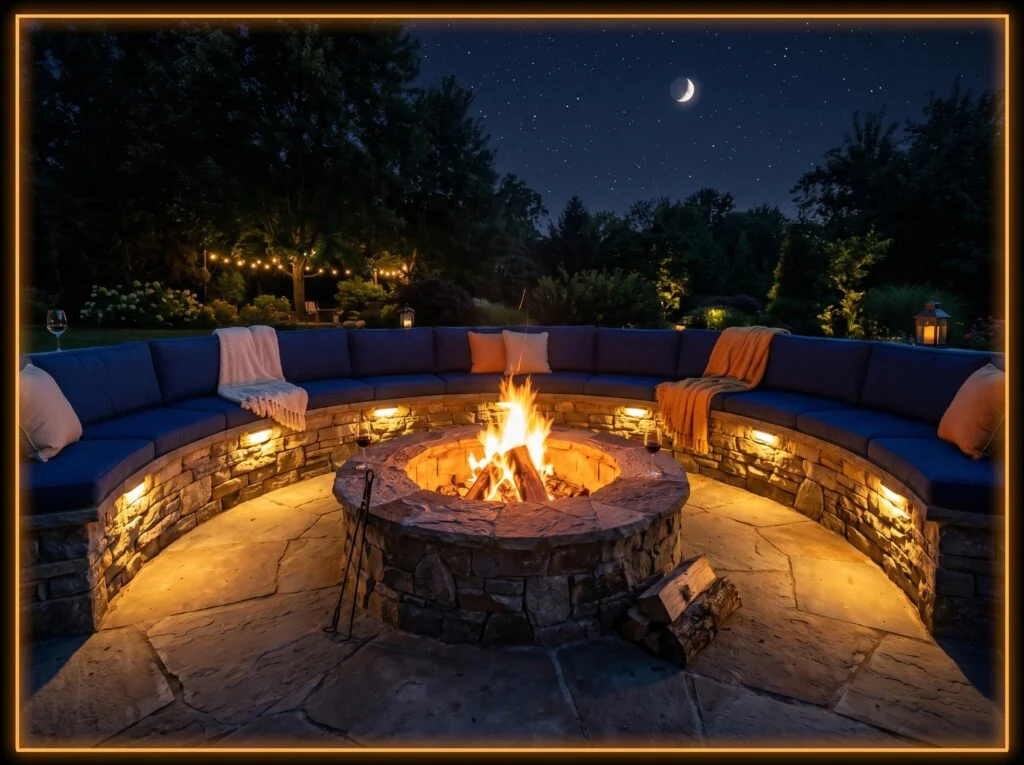
Adding recessed low-voltage LED lighting into the face of a built-in seating wall around a fire pit creates a layered lighting composition that completely transforms the space after dark. The wall lights glow at ankle and knee level while the fire provides mid-level warmth and light the combination produces a wrap-around glow that makes the fire pit area feel like an outdoor room with walls made of light rather than an open patio with a fire in the middle. For landscaped backyards where evenings are a primary use time, this lighting integration separates a well-designed fire pit area from a standard one.
Use 12-volt LED brick lights or step lights designed for in-wall installation they run on standard low-voltage landscape lighting transformers and consume very little electricity. Space them 18 to 24 inches apart along the seating wall face for even illumination without harsh hot spots. Wire them to a timer or a smart plug so the wall lights turn on automatically at dusk without any manual operation. Choose warm white (2700K) bulbs to complement the fire’s amber glow rather than competing with it. The in-wall wiring should be planned and installed before the seating wall is finished running conduit and wire through a completed masonry wall is significantly more difficult and expensive than pre-planning during construction.
Galvanized Metal Tub Fire Pit
A galvanized metal tub fire pit offers a simple and budget-friendly way to create a cozy outdoor gathering space. The rustic metal finish adds farmhouse charm, while the durable design makes it suitable for patios, gardens, and backyard settings. This versatile option brings warmth and character to casual outdoor entertaining.
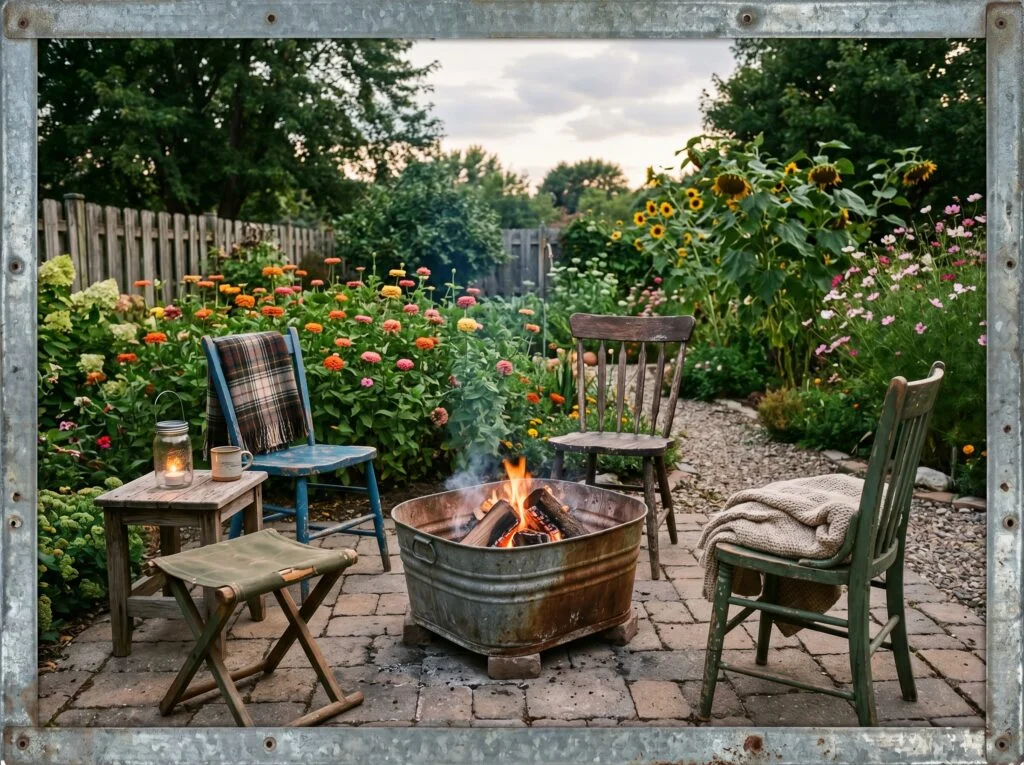
A galvanized metal washtub repurposed as a fire pit is the most creative and affordable backyard fire pit idea on this list the whole setup costs under $50 and looks genuinely charming in a casual, vintage, or cottage garden setting. Drill 12 to 16 drainage and airflow holes in the base of the tub, set it on four bricks or a stack of pavers to raise it off the ground and allow the airflow underneath that feeds a clean burn, and line the base with 2 inches of sand or gravel to protect the metal from the direct heat of the fire bed. The result is a completely functional fire pit with a delightful rustic character.
Galvanized metal is steel coated with zinc for corrosion resistance it handles the heat of a small wood fire adequately, though it will eventually show some heat discoloration and slight warping over many uses. This is a feature, not a flaw the aged, heat-patinated tub looks even more characterful after a season of use. Position the tub on a non-combustible surface (pavers, gravel, concrete) rather than directly on a wood deck or grass. The relatively small diameter (typically 24 to 30 inches) makes this best suited for intimate gatherings of two to four people rather than larger group settings. It’s the perfect fire pit for a small cottage garden, a rental property, or anyone who wants a fire pit experience without any construction investment.
If you regularly host larger groups, roomier seating for bigger gatherings can help the space scale up comfortably.
Mediterranean-Style Tile Mosaic Fire Pit
A Mediterranean-style tile mosaic fire pit adds vibrant color and artistic charm to outdoor spaces. The decorative patterns and handcrafted details create a striking focal point, while the warm tones enhance the cozy atmosphere around the seating area. This elegant design pairs beautifully with Mediterranean, Spanish, and resort-inspired landscapes.
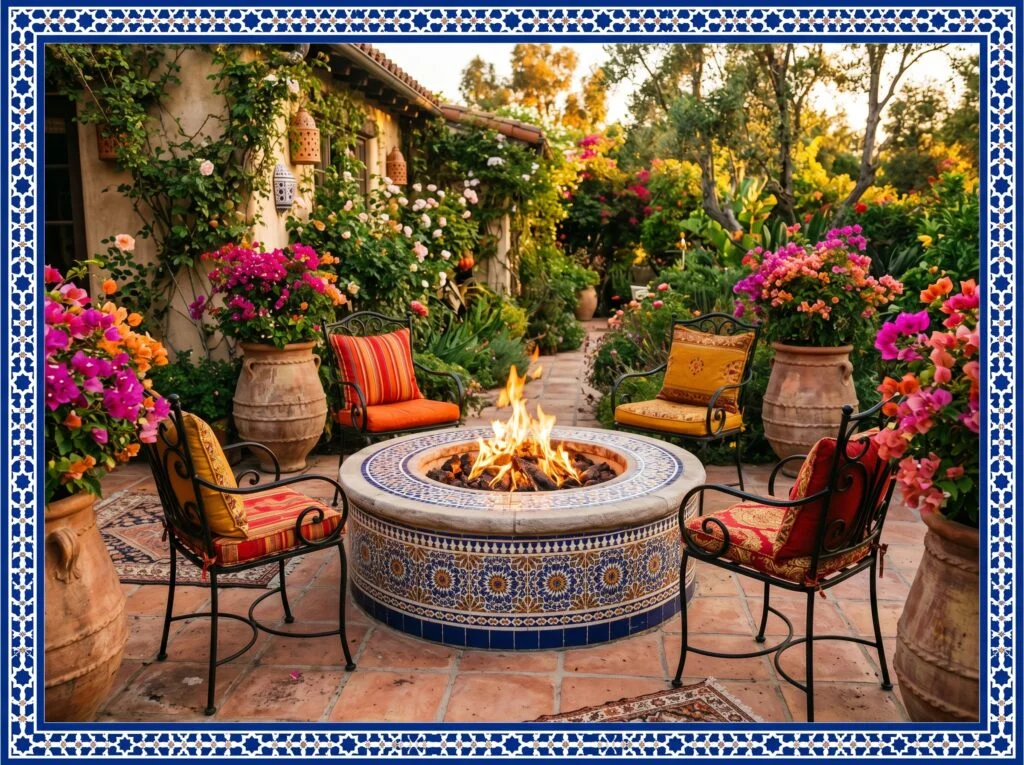
A tile mosaic fire pit surround is the most visually distinctive fire pit design on this list it turns a functional fire feature into a genuine piece of outdoor art. Moroccan-style blue and white ceramic tile, Talavera tile in bright traditional colors, or a custom mosaic design applied to the exterior face of a standard block or concrete fire pit surround creates a fire pit that’s a conversation starter even when the fire isn’t lit. In a backyard with Mediterranean, Spanish, or globally eclectic design influences, a mosaic tile fire pit is completely at home it ties the design language of the outdoor space together at the floor level.
Use outdoor-rated ceramic tile and exterior tile adhesive for this application standard indoor tile adhesive fails in outdoor temperature cycling conditions. Apply the tile over a concrete block or poured concrete base rather than over natural stone, which has an uneven surface that makes tile adhesion difficult. Use an unsanded tile grout rated for outdoor use and seal the grout annually to prevent moisture penetration. Keep the tile work on the exterior surround face only the interior of the fire pit should remain unclad concrete or firebrick to handle the direct heat exposure. This is a project that rewards patience and a steady hand but requires no special masonry skills mosaic tile work is accessible to any motivated DIYer.
Fire Pit with Outdoor Rug and Defined Seating Zone
A fire pit with an outdoor rug and defined seating zone creates a cozy and well-organized gathering space. The rug helps anchor the furniture arrangement, while the designated seating area makes the backyard feel more comfortable and inviting. This thoughtful setup adds warmth, style, and a living-room feel to outdoor entertaining.
A large outdoor rug placed beneath and around the fire pit seating area is the detail that transforms a collection of patio furniture around a fire pit into a defined outdoor room. The rug’s edge communicates where the seating zone begins and ends, which makes the arrangement look planned and designed rather than simply arranged. In a large patio or backyard where the fire pit sits in an open expanse of concrete or pavers, the rug provides the boundary that gives the seating area its own identity and scale. It’s the same principle used in living rooms where a rug defines the conversation area applied outdoors with equivalent results.
Choose an outdoor rug made from polypropylene or recycled PET plastic fiber both are fully moisture-resistant, easy to clean with a garden hose, and UV-stable for years of outdoor exposure. A round rug works best beneath a round fire pit; a rectangular or square rug works best beneath a rectangular fire table or square pit configuration. The rug should be large enough that all four chair legs rest on the rug when the chairs are in their normal occupied positions a rug with only the front legs of the chairs on it looks undersized and slightly awkward. For a fire pit seating area with six chairs at 7 feet from the pit center, an 8 to 10-foot diameter round rug is the correct size.
Fire Pit with Privacy Screen or Living Wall Behind
A fire pit with a privacy screen or living wall creates a more intimate and relaxing outdoor retreat. The added backdrop enhances privacy, reduces visual distractions, and introduces texture and greenery to the space. This combination also makes the seating area feel cozier, turning the fire pit into a stylish and secluded gathering spot.

A privacy screen or planted living wall behind a fire pit seating area creates the sense of an enclosed outdoor room rather than a seating arrangement sitting exposed in the middle of an open yard. The screen provides a visual back wall that defines the space, prevents the distraction of neighboring views or foot traffic, and focuses the gathering inward toward the fire. From a purely practical standpoint, it also blocks the prevailing wind direction a significant advantage for both fire performance (fires burn more consistently with reduced wind) and guest comfort (people don’t spend the evening turning their chairs to avoid smoke).
A cedar slat privacy screen, a stretched steel cable trellis with climbing plants, or a row of tall privacy arborvitae or bamboo all serve the screen function with different aesthetics. Cedar slat screens are the most popular current choice the horizontal or vertical slatted design provides privacy without fully blocking airflow, its natural wood tone complements both the fire pit and the surrounding landscape, and it can be built to any height and width. Install wall-mounted planters on the screen’s face for a living wall effect that adds greenery and fragrance to the fire pit area. Ground-mount the screen posts in concrete footings rather than surface-mounting wind loading on a tall screen is substantial and requires solid anchoring.
Conclusion
The best backyard fire pit is the one that fits your space, your climate, your family’s lifestyle, and your budget not necessarily the most expensive or the most dramatic one. A simple gravel circle with a stone ring and four Adirondack chairs can create exactly the same warm, connective gathering experience as a $10,000 sunken stone conversation pit.
Start with the practical framework fuel type, size, safety setbacks, and surface compatibility. Then choose the style that genuinely matches how your family uses the backyard and how you want the space to feel. Build it correctly and maintain it properly, and a backyard fire pit will be one of the most consistently used and most loved features of your outdoor living space for decades
From there, building out an outdoor living area that ties it together turns the fire pit into the heart of the whole backyard.