A dim, dingy garage isn’t just annoying it’s holding your whole space back from being safer, more functional, and actually usable. These 19 garage lighting ideas range from bright LED panels to sleek overhead fixtures giving you better visibility, a more organized workspace, and a garage that finally feels finished. Let’s get started with these garage lighting ideas to brighten your space!
Once the lighting is sorted, there are other ways to finish the space and keep it clutter-free too.
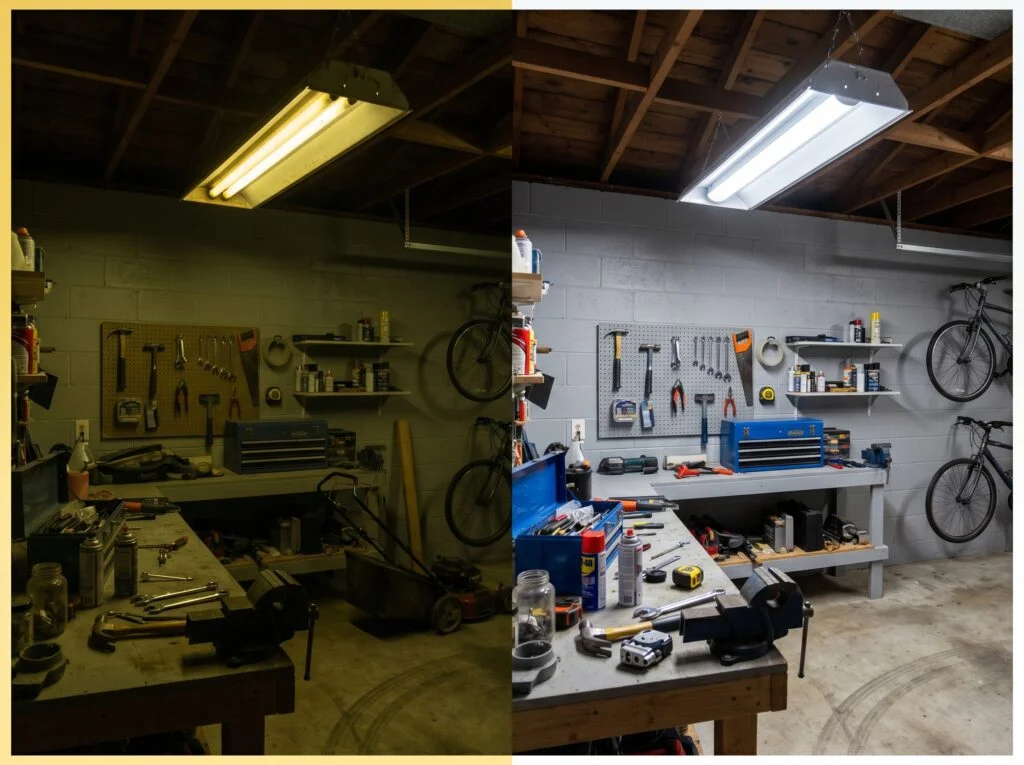
LED Shop Lights (The Non-Negotiable Starting Point)
LED shop lights provide bright, efficient, and reliable illumination that makes garages more functional for projects, storage, and everyday tasks. Their energy-saving design, long lifespan, and wide light coverage make them an essential starting point for creating a well-lit workspace.
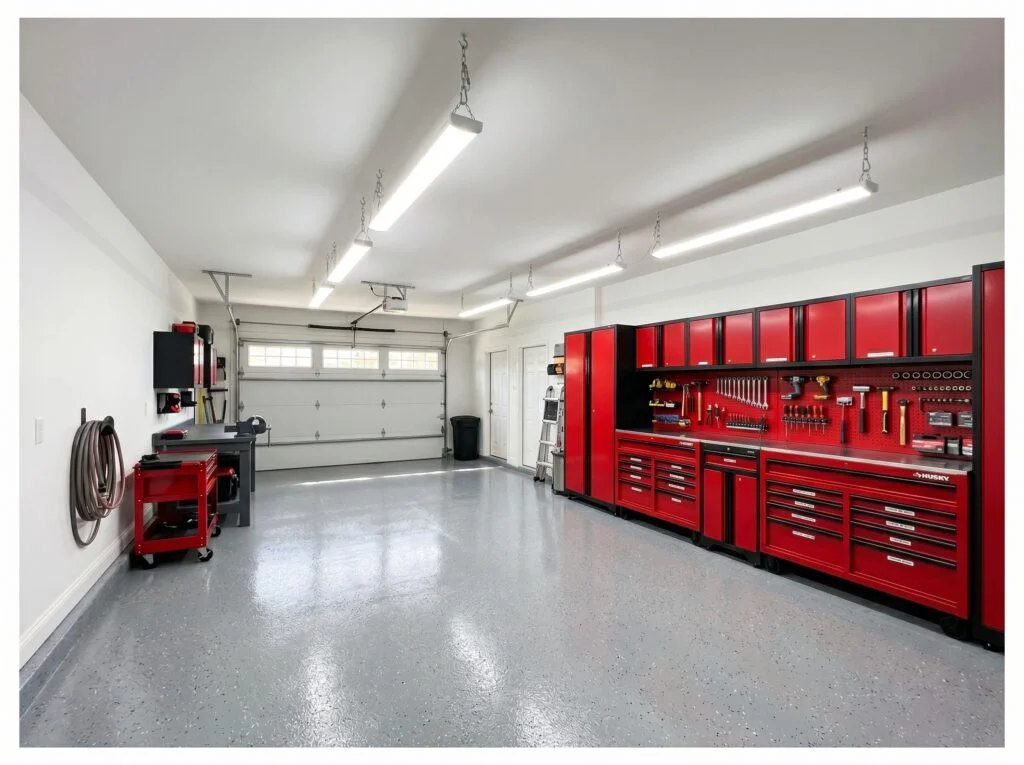
LED shop lights are the single most impactful upgrade you can make to any garage. One fixture swap changes everything. A quality 4-foot LED shop light produces between 4,000 and 6,000 lumens, and you can daisy-chain multiple units together using just one outlet.
The linkable feature is what separates good shop lights from great ones. Look for fixtures that include a short power cord between each unit so you can space them evenly across the ceiling without visible extension cords running wall to wall. Choose 5000K color temperature for the clearest, most natural light.
High-Bay LED UFO Lights for Tall Ceilings
High-bay LED UFO lights are ideal for garages with tall ceilings, delivering powerful overhead illumination across large areas. Their compact design, wide beam coverage, and energy efficiency help create a brighter, safer workspace for vehicles, tools, storage, and DIY projects.
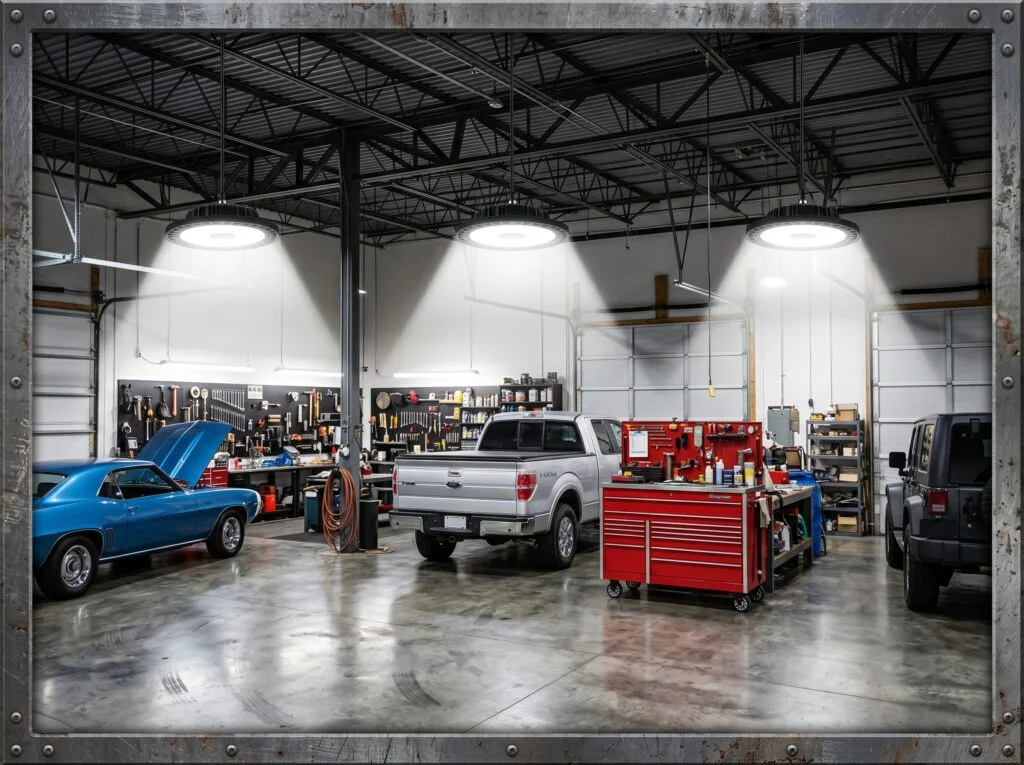
If your garage has ceilings above 8 feet, standard shop lights often spread their light too wide before it reaches the floor. High-bay LED fixtures are designed specifically for tall spaces they project a concentrated, powerful beam downward so the floor level still gets the brightness it needs. UFO-style high-bay lights are round, compact, and can produce 15,000 to 30,000 lumens per fixture.
Mount high-bay lights directly above your primary work zones over the car bay, over the workbench, or over a gym area. Space them no more than 10 to 12 feet apart for even coverage without dark spots between fixtures. They come with a hook-and-cord hanging system that makes installation straightforward if you have an existing ceiling outlet.
Deformable LED Bulbs (The Easiest No-Wiring Upgrade)
Deformable LED bulbs offer a quick no-wiring lighting upgrade for garages that need better brightness without complex installation. Their adjustable panels allow you to direct light into dark corners, making them a simple and affordable solution for improving visibility in any workspace.
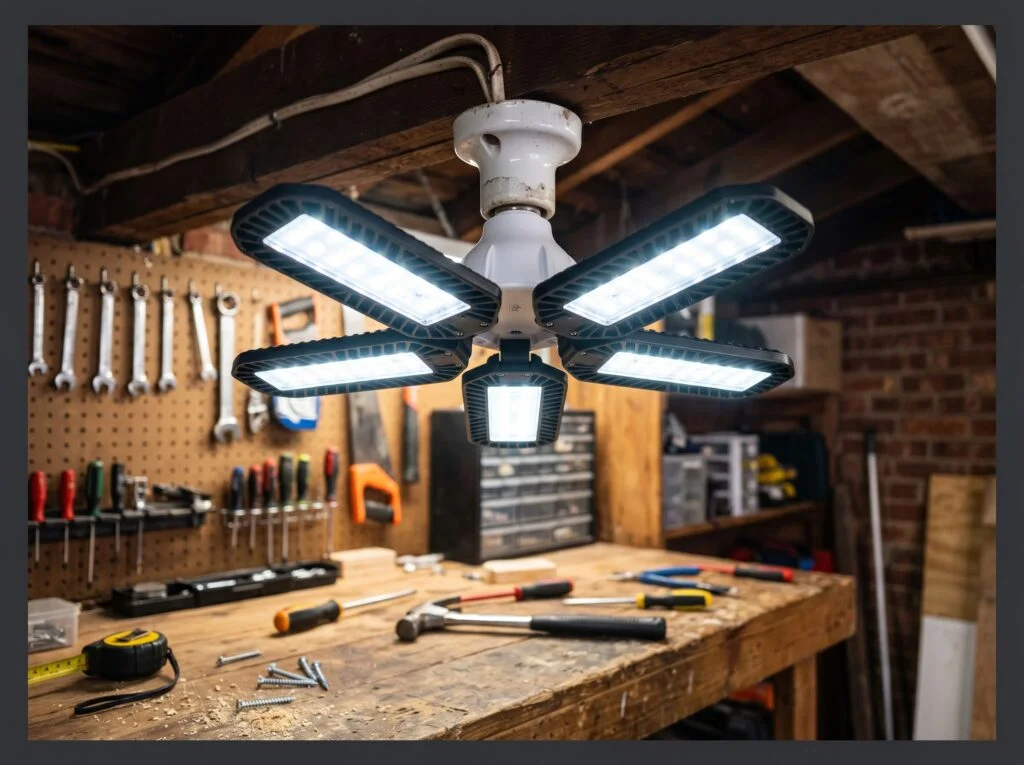
If you’re not comfortable doing any electrical work and your garage only has one or two light sockets, deformable LED bulbs are your fastest win. They screw directly into any standard E26 socket the same socket your old incandescent bulb was using and the adjustable panels extend the light in multiple directions instead of casting it in a single downward cone.
Bend each panel toward the dark areas of your garage for targeted improvement. Point one panel at the workbench, one at the car bay, one at the shelving wall. You’re essentially getting three directional lights from a single fixture.
Linkable LED Vapor Tight Fixtures
Linkable LED vapor tight fixtures provide powerful, consistent lighting for garages, workshops, and utility spaces where durability matters. Their sealed design helps protect against dust and moisture, while the ability to connect multiple fixtures creates even illumination across larger areas.
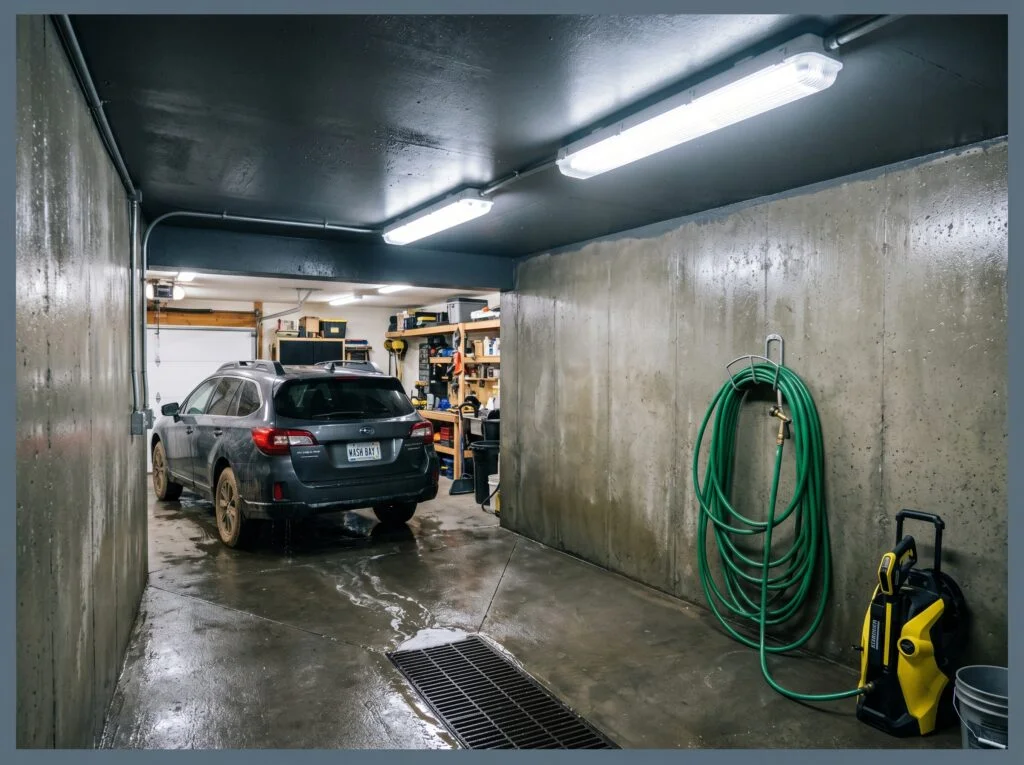
If your garage gets damp, dusty, or sees temperature swings between seasons, standard shop light fixtures can fail prematurely. Moisture gets inside, condensation damages the driver board, and bulbs flicker and die within months. Vapor-tight LED fixtures solve this completely. They’re fully sealed in a polycarbonate housing that blocks moisture, dust, insects, and sawdust from ever reaching the electronics inside.
For a garage that doubles as a wash bay, a gym where sweat and humidity build up, or a woodworking space where fine sawdust fills the air, vapor-tight fixtures are worth the slightly higher upfront cost. They typically cost $40 to $80 each but last significantly longer than open fixtures in challenging environments.
Hexagonal LED Panel Grid Systems
Hexagonal LED panel grid systems add a modern, high-tech look to garage spaces while providing bright, evenly distributed lighting. Their geometric design improves visibility for detailed work, car detailing, and creative projects while turning the ceiling into a stylish feature.
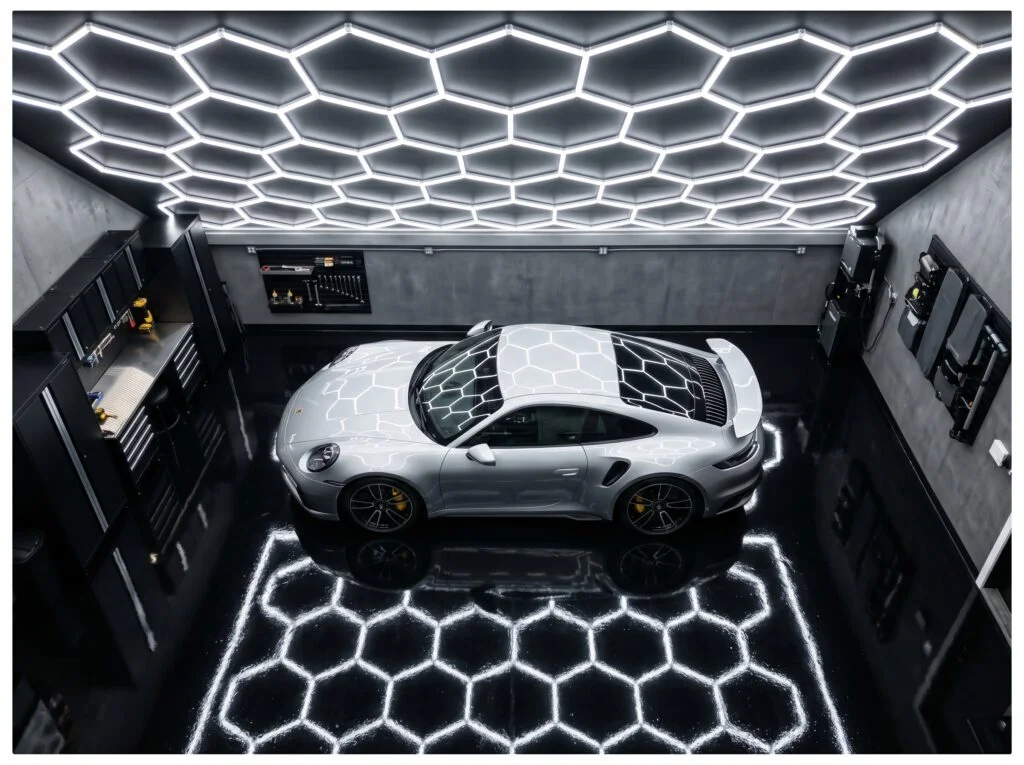
Hexagonal LED panel grids are where garage lighting meets genuine visual design. These modular honeycomb fixtures connect together to create a continuous pattern across your ceiling, and they produce extraordinarily even light with no shadows whatsoever.
The modular system works by snapping individual hexagon units together and then linking them to power. You can cover a small section of ceiling or the entire surface, depending on your budget and goals. Most systems are available in cool white (5000K) or warm white (3000K) choose 5000K for detail work and warm white if you want the space to feel more like a car lounge.
Pairing good fixtures with a cleaner overall look for your walls makes the whole upgrade feel complete.
Motion-Activated LED Ceiling Lights
Motion-activated LED ceiling lights provide a convenient and energy-efficient way to brighten your garage without searching for switches in the dark. They automatically turn on when movement is detected, making your workspace safer while reducing unnecessary energy use.
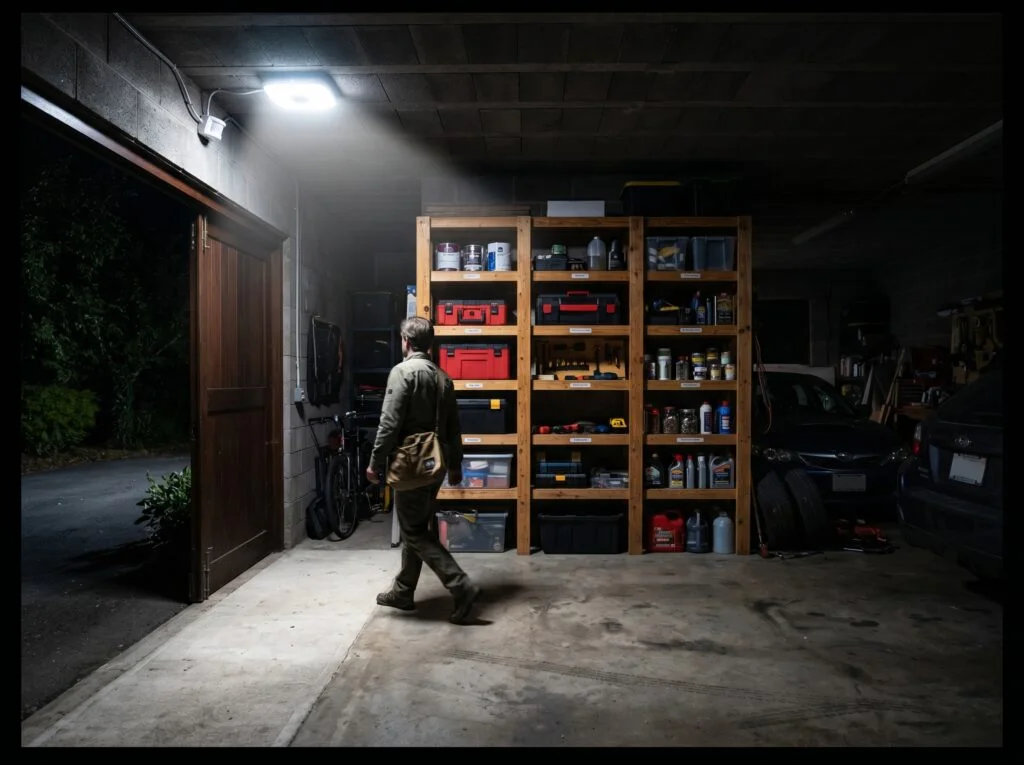
Motion-activated lights are one of the most practical garage lighting upgrades most people never think about. They turn on the moment you walk in with your hands full of groceries, they stay on while you’re moving around, and they turn off automatically after a set delay when you leave.
Look for a motion sensor light with adjustable sensitivity and timer settings so you can set it to stay on for exactly as long as you need typically two to five minutes is right for a garage. Mount them near the entry door, above the car parking area, and near any stairs that lead to a raised storage area.
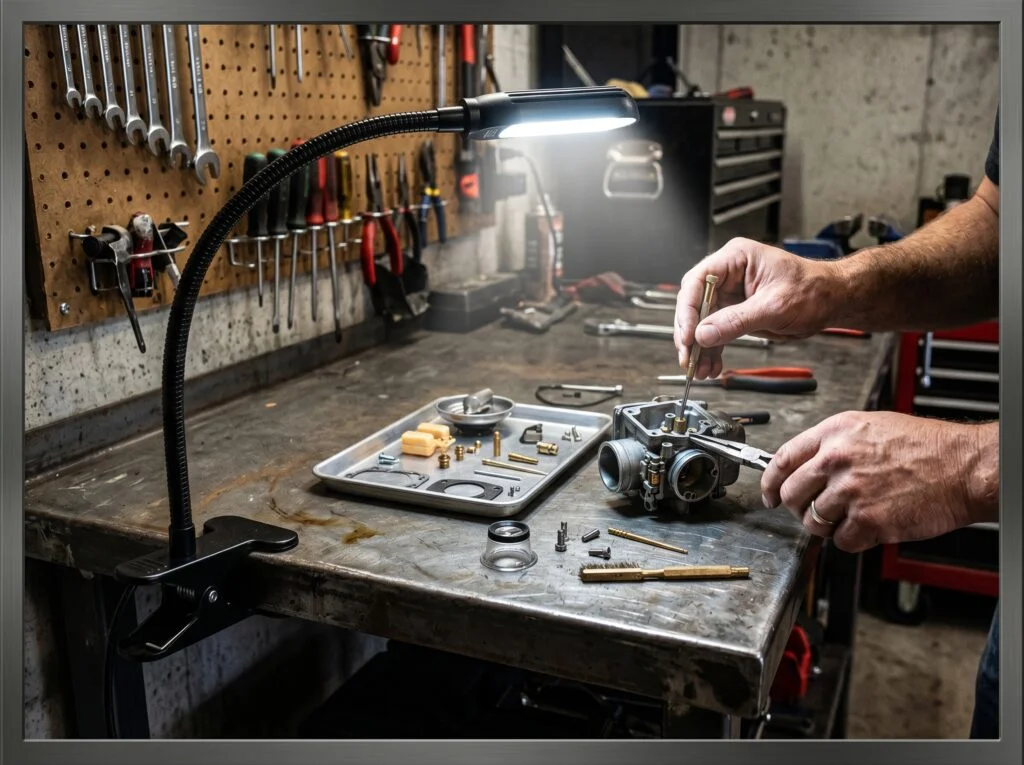
Under-Cabinet and Workbench Task Lighting
Under-cabinet and workbench task lighting improves visibility for detailed garage projects, repairs, and DIY work. By placing focused lights near work areas, you can reduce shadows, work more accurately, and create a more efficient workspace without relying only on overhead lighting.
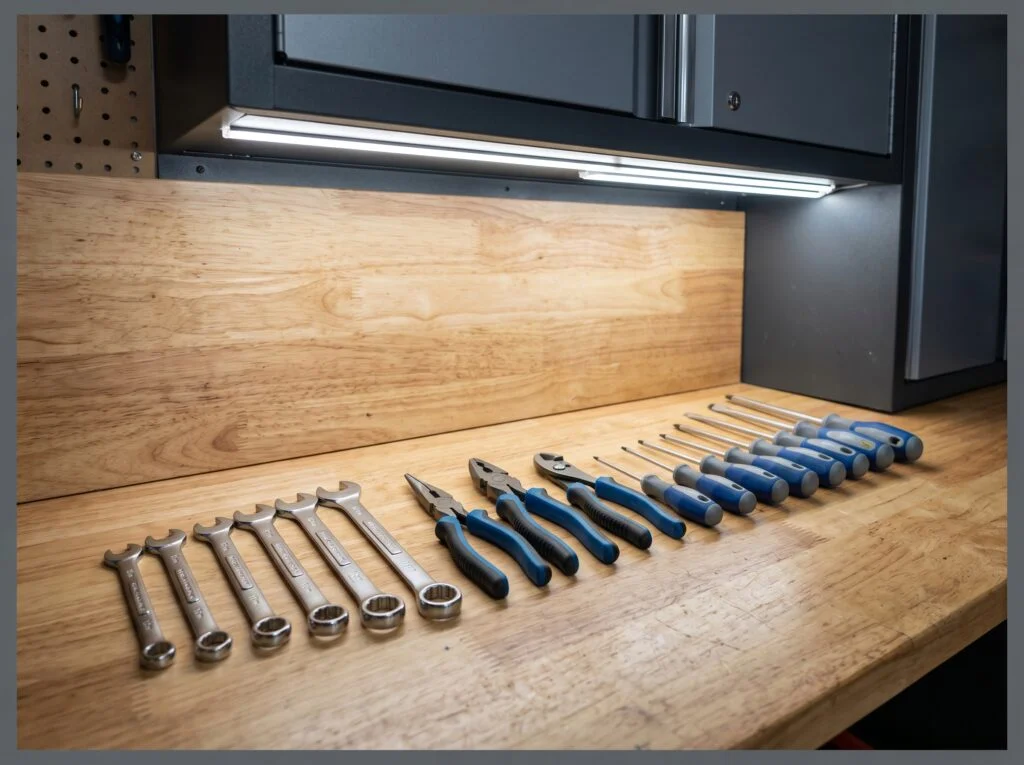
Overhead lighting no matter how bright always creates shadows on a workbench. Your own body, your arms, and the project itself block the light from above and create exactly the shadow in the spot where you need to see most clearly. Under-cabinet task lighting solves this permanently.
Use a 4000K to 5000K LED strip for workbench task lighting it needs to be clear and accurate, not warm and moody. Install the strip toward the front edge of the cabinet underside so it shines forward onto the work surface rather than straight down at the bench back wall. A simple plug-in LED strip with an adhesive backing installs in five minutes and costs under $20 for a six-foot workbench.
Magnetic LED Work Lights
Magnetic LED work lights offer flexible and portable illumination for garage tasks, allowing you to place light exactly where it is needed. Their strong magnetic bases make them ideal for repairs, detailing, and tight spaces where traditional lighting cannot provide enough visibility.

Magnetic LED work lights are the garage lighting tool that moves with you. They attach instantly to any metal surface the side of a tool cabinet, the hood of a car, the underside of a shelf, or the inside of an engine bay and they point exactly where you need them.
Most magnetic work lights are rechargeable via USB-C, which means no cords and no batteries to replace. A good one lasts four to eight hours on a charge, which covers even a full day’s project work. Look for a model with at least 1,000 lumens, an adjustable light head, and a strong enough magnet to hold position even when the attached surface vibrates.
Smart Garage Lighting with App Control
Smart garage lighting with app control adds convenience and customization to your workspace by allowing you to adjust brightness, schedules, and settings from your phone. It helps create the perfect lighting environment for projects while improving energy efficiency and everyday usability.
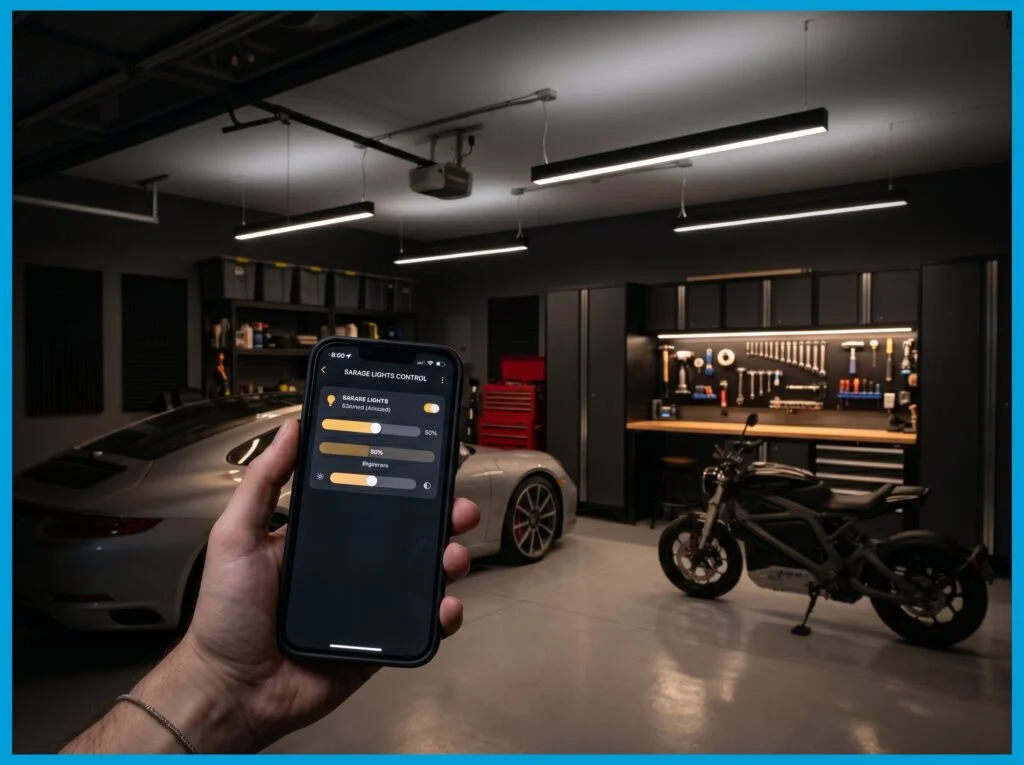
Smart lighting in a garage sounds like a luxury until you actually use it and then it feels essential. Smart LED fixtures connect to your home WiFi and integrate with Google Home, Amazon Alexa, or Apple HomeKit.
Dimming capability is the most underrated smart lighting feature. When you’re in the garage late at night watching a game, reading, or just relaxing, 100 percent brightness is uncomfortable. Smart lights let you dim down to 20 or 30 percent for a comfortable atmosphere without installing a separate dimmer switch.
Retractable Cord Reel Work Lights
Retractable cord reel work lights provide flexible illumination for garages and workshops by keeping power cords organized and easily accessible. Their retractable design reduces clutter while allowing you to bring bright task lighting exactly where it is needed during repairs or projects.
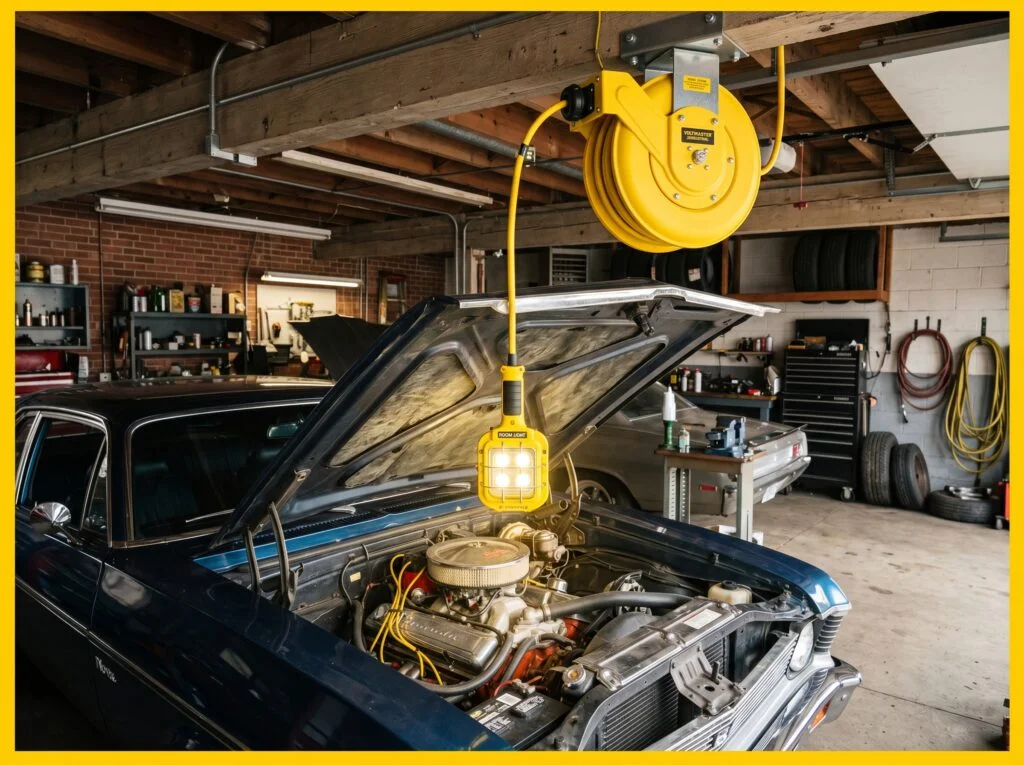
Retractable cord reel lights solve one of the most annoying garage problems the orange extension cord that snakes across the floor and trips you every single time. A retractable reel mounts to the ceiling or a wall bracket, and the cord stores itself neatly overhead when not in use.
Choose a model with at least a 20-foot cord for maximum flexibility in a standard two-car garage. The integrated work light should produce at least 1,000 lumens enough to clearly illuminate an engine bay or a section of chassis during mechanical work. Some models include a swivel head on the light for precise angle adjustment.
LED Strip Lights for Garage Floor Perimeter
LED strip lights for a garage floor perimeter add a modern touch while improving visibility around walkways, vehicles, and storage areas. They create a clean illuminated border that enhances safety, highlights the garage design, and gives the space a sleek, customized look.
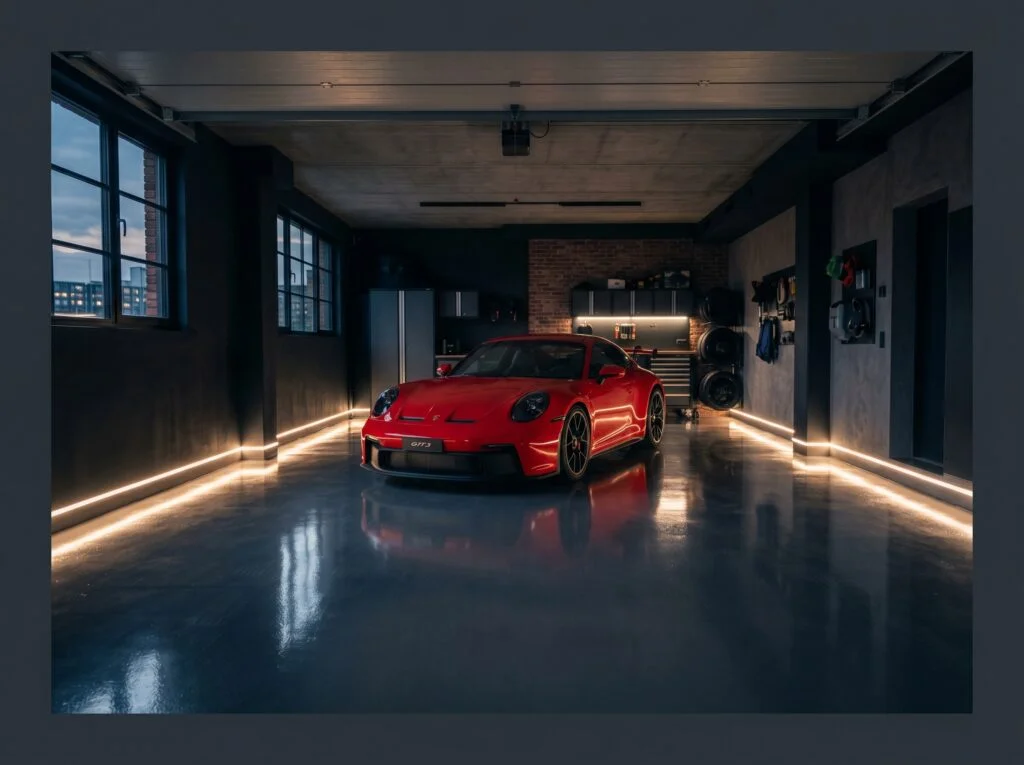
LED strip lights along the floor perimeter are purely atmospheric, but they do something that functional lights can’t — they make your garage feel like a space you actually want to spend time in. Running a strip along the baseboard where the wall meets the floor creates an indirect glow that eliminates harsh shadow lines at floor level and makes the space feel larger and more finished.
Use a warm white (3000K) strip for this application — it looks significantly better against a dark epoxy floor than a cool white. Secure the strip with the adhesive backing and a few strategic clips around corners to prevent peeling over time.
Industrial Gooseneck Exterior Wall Sconces
Industrial gooseneck exterior wall sconces add a bold architectural detail to garages while providing focused outdoor lighting around entrances and driveways. Their classic metal design enhances curb appeal and creates a stylish industrial look that blends durability with practical nighttime visibility.
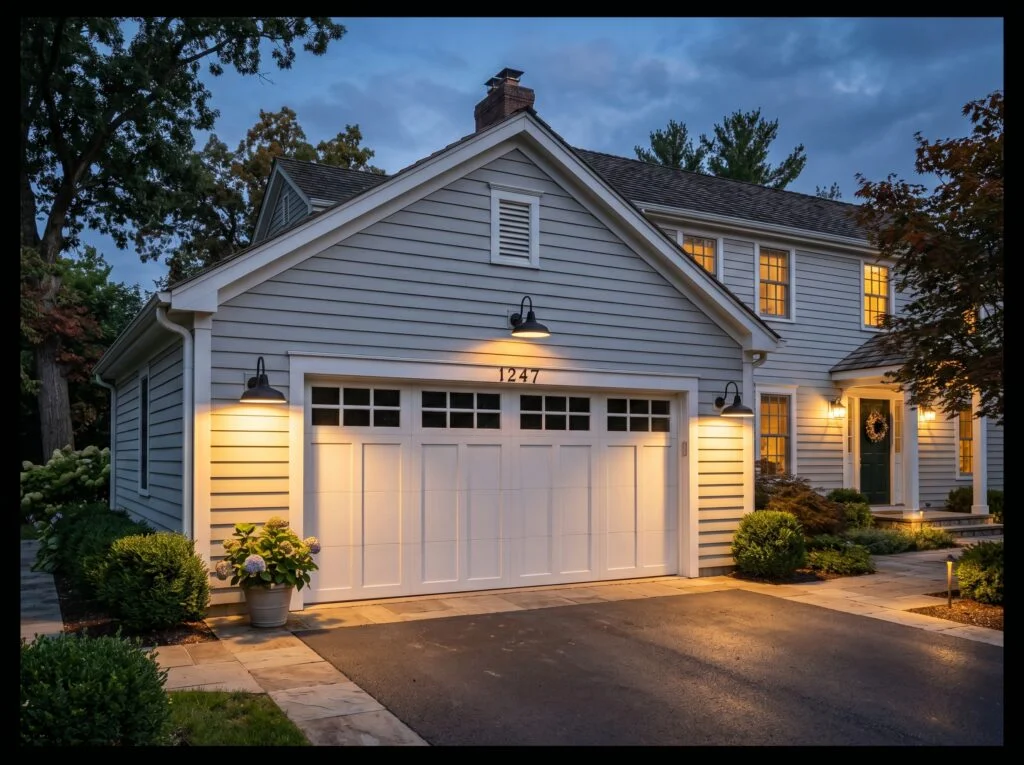
Your garage exterior lighting matters just as much as the interior maybe more for curb appeal. Industrial gooseneck sconces mounted on either side of the garage door provide functional security lighting while adding genuine architectural character to the front of your home.
Space the sconces symmetrically about 12 to 18 inches from each side of the garage door opening. Choose a model rated for outdoor use (IP44 or higher) and pair it with a warm white LED bulb in the 2700K to 3000K range for the most welcoming driveway glow. A photocell socket adapter lets the lights turn on automatically at dusk and off at dawn without a timer.
If you’re already updating the exterior, it’s worth considering a few finishing touches near the entry door as well.
Recessed Puck Lights Inside Storage Cabinets
Recessed puck lights inside storage cabinets provide focused illumination that makes tools, supplies, and stored items easier to find. These compact lights create a clean, organized look while improving functionality in garage storage areas without taking up valuable space.
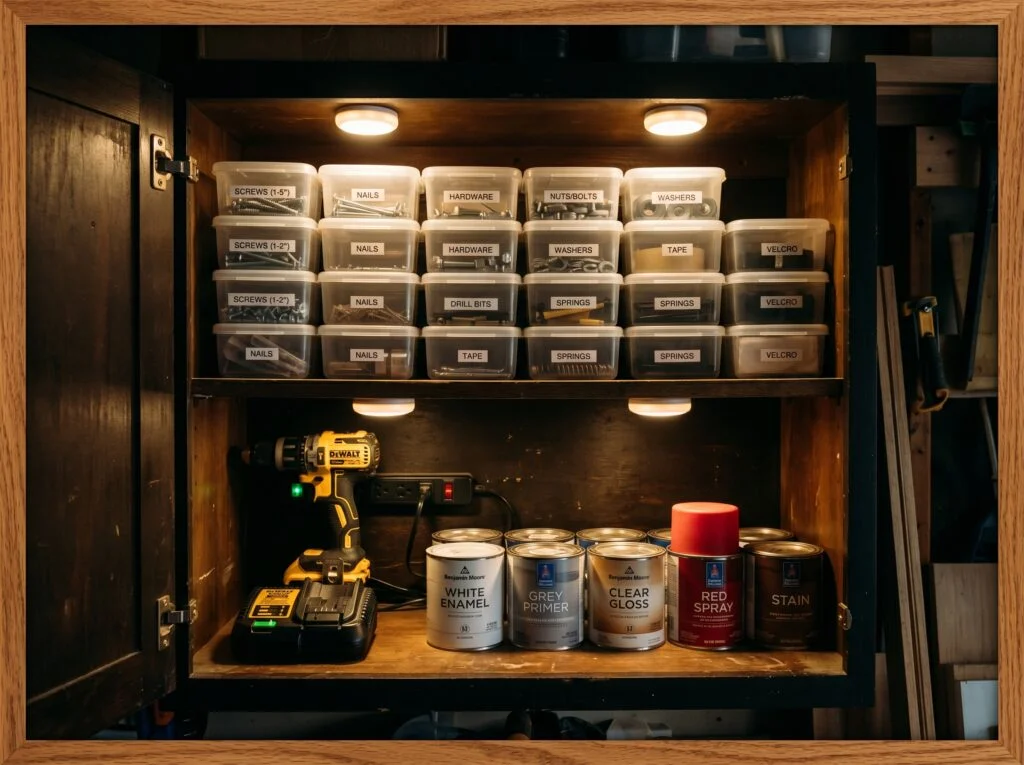
The inside of a closed garage cabinet is one of the darkest spots in any garage, and it’s exactly where you store things you actually need to find quickly. Recessed puck lights small, round, low-profile LEDs mount inside the cabinet or to the underside of a shelf and light up the interior the moment you open the door.
Battery-operated puck lights are the easiest option since they require no wiring. Three AAA batteries typically power a puck light for several months of regular use. Rechargeable versions are slightly more expensive but eliminate battery replacement entirely. Mount them in corners where the overhead light casts the deepest shadow usually the back half of the cabinet and the lower shelves.
Good lighting pairs naturally with smarter layouts for tool storage throughout the rest of the garage.
Clamp-On Flexible Neck Task Lamps
Clamp-on flexible neck task lamps offer adjustable lighting for detailed garage work by allowing you to direct light exactly where it is needed. Their easy installation and movable design make them perfect for workbenches, repairs, crafting, and DIY projects.
Some tasks require light in places no fixed fixture can reach. Repairing a small engine component, soldering an electronics board, carving a detail in wood, or reading a wiring diagram on paper — these jobs need concentrated, close-range light that you can position within inches of the work.
Choose a lamp with a color temperature around 4000K to 5000K for detail work you need accurate color rendering to see what you’re actually doing. A built-in dimmer is useful for adjusting intensity based on the task. Look for a clamp width of at least two inches to grip securely on standard bench thicknesses.
Overhead Lighting Zones: The Three-Zone Strategy
The three-zone overhead lighting strategy divides garage illumination into dedicated areas for general visibility, focused tasks, and storage needs. By layering different lighting zones, you can create a more efficient workspace with better brightness, improved organization, and greater control over how each area is used.
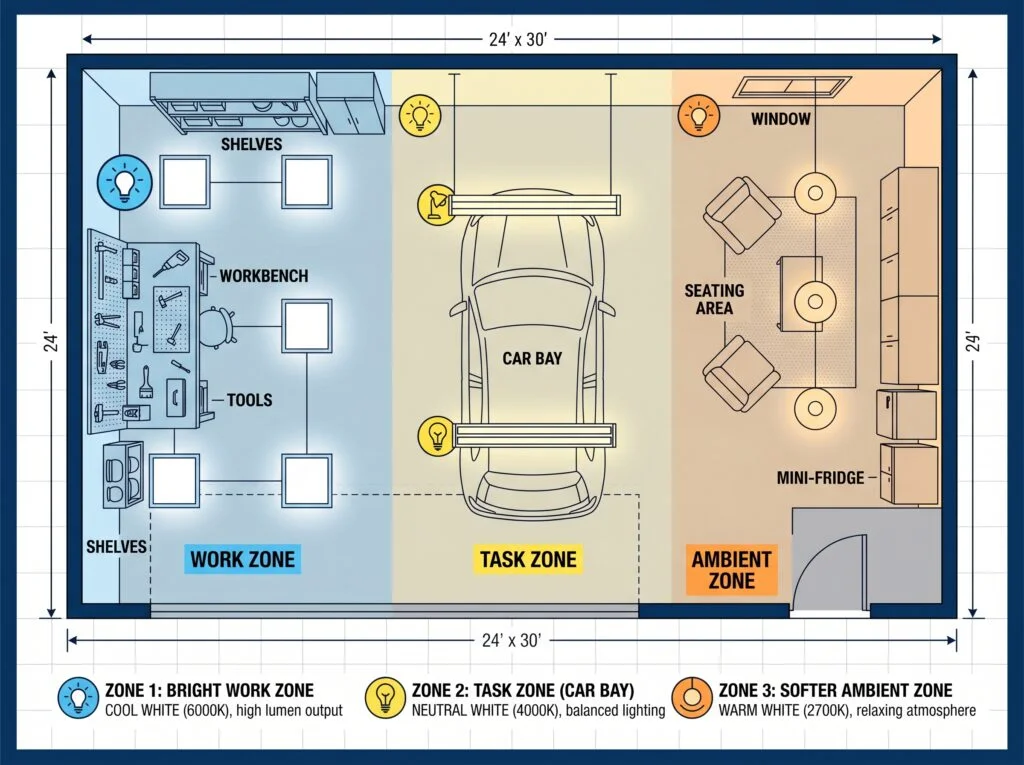
This is the concept most garage lighting articles completely miss, and it’s the single most important principle for planning a well-lit garage. Not every part of your garage needs the same light. A workbench needs intense, focused task lighting. The car bay needs broad, even overhead coverage.
Battery-Powered Portable LED Work Lights
Battery-powered portable LED work lights provide flexible illumination wherever you need it, without depending on outlets or extension cords. Their compact, cordless design makes them perfect for garage repairs, emergencies, and hard-to-reach areas where extra light is required.
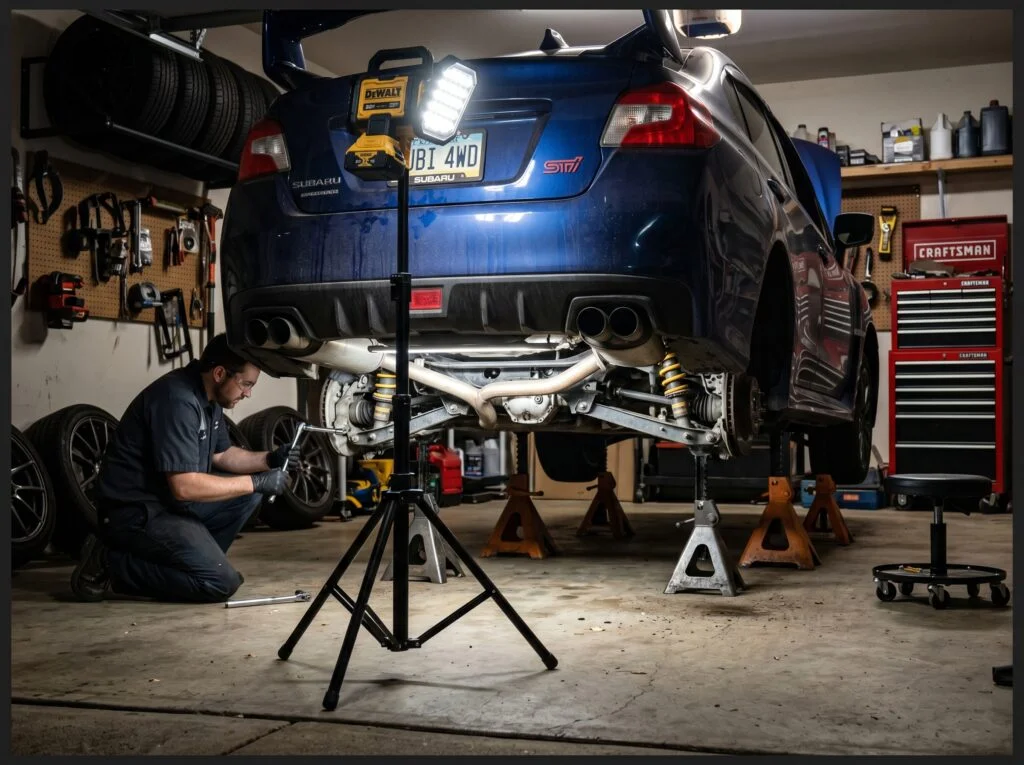
A freestanding portable LED work light on a telescoping tripod is the most versatile piece of lighting equipment you can own. It sets up in under a minute, stands on its own without any mounting or drilling, extends to different heights, and produces enough light to illuminate an entire work area independently.
Battery-operated versions in the 2,000 to 5,000 lumen range run for four to ten hours on a charge and have genuinely replaced corded work lights for most tasks. Look for a model that charges via a standard power outlet rather than proprietary charger simpler charging means it actually gets charged regularly. Folding tripod legs keep it stable even on uneven surfaces. The adjustable head tilts forward and backward for precision angle control.
Skylights and Solar Tubes for Daytime Natural Light
Skylights and solar tubes bring natural daylight into garages, reducing the need for artificial lighting during the day. They create a brighter, more welcoming workspace while helping save energy and making the area feel more open and comfortable.
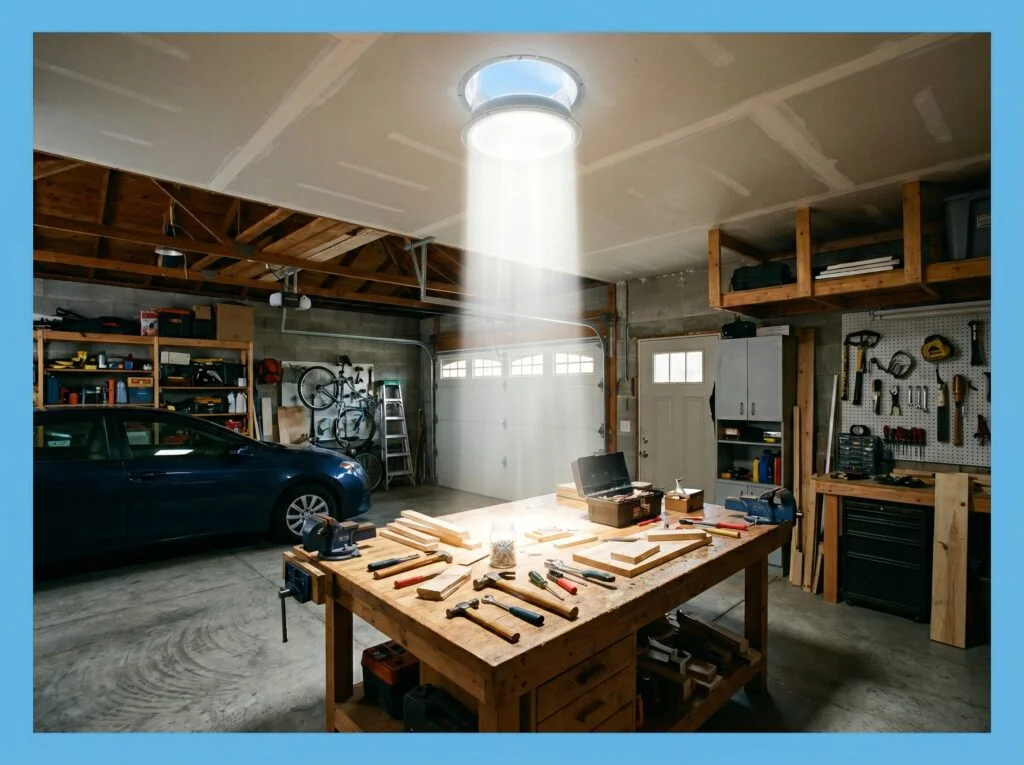
Natural light is something almost every garage completely lacks, and it’s genuinely the best light source available for any kind of work. A solar tube also called a tubular skylight is a reflective tube that runs from your roof surface down through the ceiling insulation and diffuses natural sunlight into the garage below.
Installation requires cutting a hole in your roof and ceiling, running the reflective tube through the attic space, and sealing everything weathertight typically a two to four hour job for a confident DIYer or a half-day for a professional installer. Costs range from $150 for a DIY kit to $400 to $800 professionally installed, including all materials.
For the area just outside the garage, a few outdoor sconces for driveway curb appeal round out the whole approach nicely.
Color-Changing RGB LED Accent Strips
Color-changing RGB LED accent strips add a customizable and modern touch to garage spaces while enhancing the overall atmosphere. With adjustable colors and lighting effects, they can highlight storage areas, work zones, or décor features while creating a personalized look.

RGB LED strip lights are the fun garage lighting idea they’re not for working under, but they transform a plain garage into a space with genuine personality. Wrap them under the workbench edge, along the ceiling perimeter, inside an open cabinet, or under the car parking area.
These are purely additive they work alongside your primary overhead lighting, not instead of it. The best use is as a layer of accent and mood lighting that makes the space feel finished and designed rather than purely utilitarian. A 16-foot roll of color-changing LED strip with a WiFi controller costs between $20 and $40 and covers the perimeter of most single-car garage workbench areas easily.
Fluorescent-to-LED Retrofit Tubes
Fluorescent-to-LED retrofit tubes provide an easy way to upgrade outdated garage lighting without replacing the entire fixture. They offer brighter illumination, lower energy consumption, and improved reliability, making them a practical solution for modernizing older workspaces.
If your garage already has fluorescent tube fixtures installed which describes the majority of garages built before 2015 — you don’t necessarily need to replace the entire fixture. LED retrofit tubes, also called Type A LED tubes, install directly into existing fluorescent ballasts without any rewiring.
For even better performance and long-term reliability, consider Type B LED tubes, which bypass the ballast entirely and wire directly to line voltage. This requires removing the ballast from the circuit a fifteen-minute job with basic electrical knowledge but it eliminates the ballast as a future failure point and improves efficiency by another 10 to 15 percent.
Conclusion
A dark, poorly lit garage is frustrating in the best case and genuinely dangerous in the worst. Tools are hard to find, work is hard to do accurately, and moving around in the dark creates real risk of tripping and injury. Good lighting fixes all of that, and the cost is almost always far less than people expect.
Start with the basics LED shop lights or deformable bulbs to replace whatever dim situation currently exists. Add task lighting above the workbench. Put motion sensors near the entry door. Then, if your budget allows, layer in the details: under-cabinet strips, accent lighting, smart controls, and exterior sconces.
You don’t need to do all 19 ideas at once. Pick the two or three that solve your biggest problems today. Once you see how much better a properly lit garage feels to work in, the rest of the list tends to happen on its own one upgrad


Pingback: 17 Garage Door Ideas for Stunning Curb Appeal